How to Draw a Face is one of the most exciting — and challenging — skills for any artist to master. Whether you are a beginner learning how to draw a face step by step or an experienced artist refining your portrait drawing technique, understanding facial structure and proportions is the key to creating realistic results.
How to Draw a Face
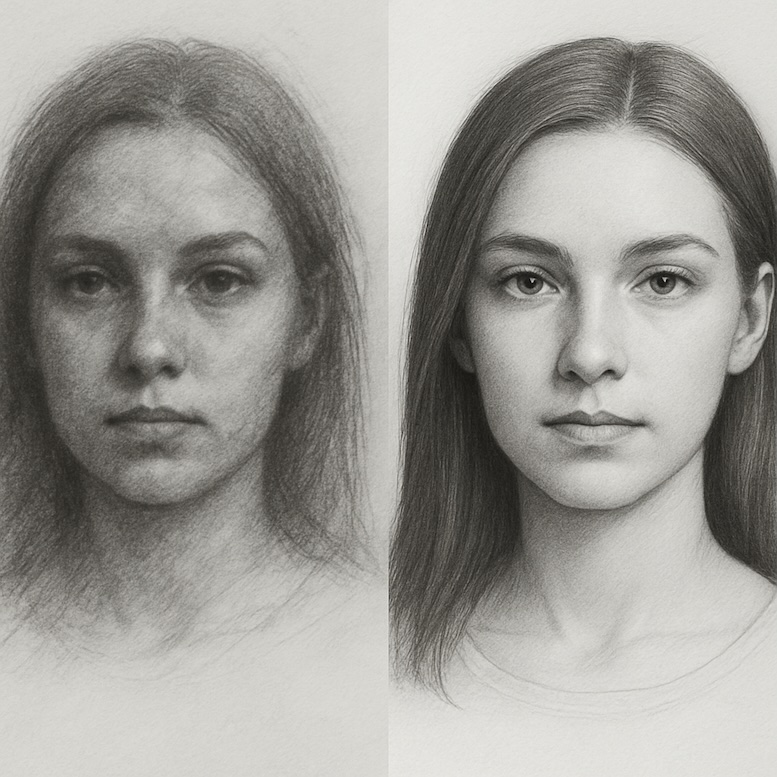
Faces are powerful. They are the first thing we notice about someone, and a well-drawn face can instantly convey emotion, character, and personality. But many beginners get frustrated because their drawings look flat, disproportioned, or unnatural. This guide solves that problem by walking you through everything — from the basic proportions of a face to capturing lifelike expressions and details.
Unlike most tutorials that focus only on a front view or simple steps, this guide goes deeper. To Draw a Face, you’ll learn:
- How to break the head into simple shapes and guidelines for accuracy
- The exact proportions of the face in front, profile, and ¾ view
- Tips for drawing individual features — eyes, nose, lips, ears — realistically
- How to add shading, depth, and expression for more lifelike results
- Common mistakes beginners make (and how to fix them)
By the end of this tutorial, you’ll have a clear step-by-step process to create portraits that actually look like real people — not cartoon characters — no matter the angle.
Understanding the Basics: Facial Structure & Anatomy
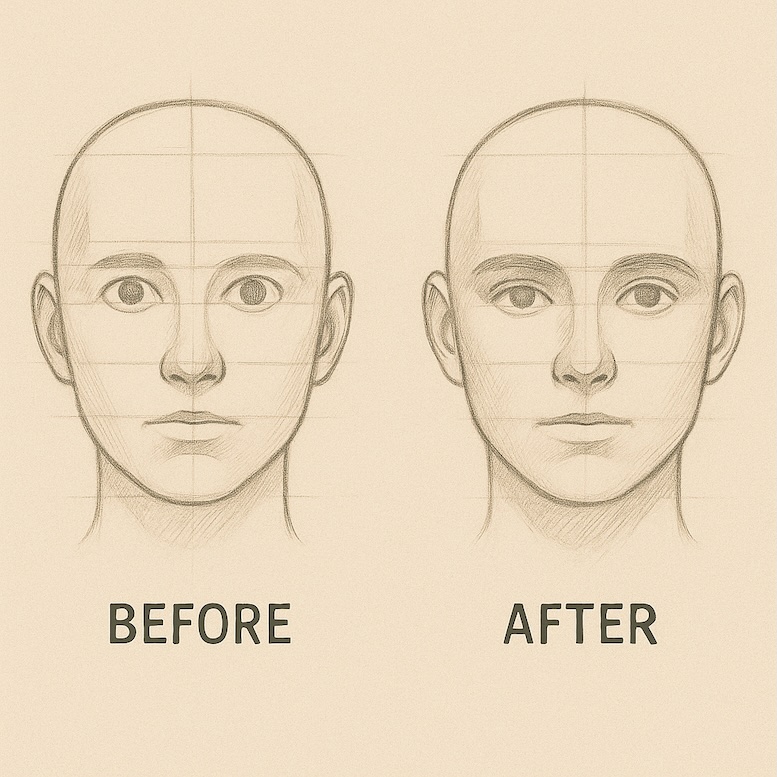
Before you can draw a realistic face, you need to understand what lies beneath the skin. Good portrait drawing isn’t just about copying what you see — it’s about building the head from the inside out. When you understand the skull structure, facial planes, and muscles, your drawings will instantly look more three-dimensional and believable.
The Skull: The Foundation of Every Face
Think of the skull as the framework of your portrait. The skull defines the overall shape of the head, the height of the forehead, the position of the eyes, the length of the nose, and the angle of the jaw.
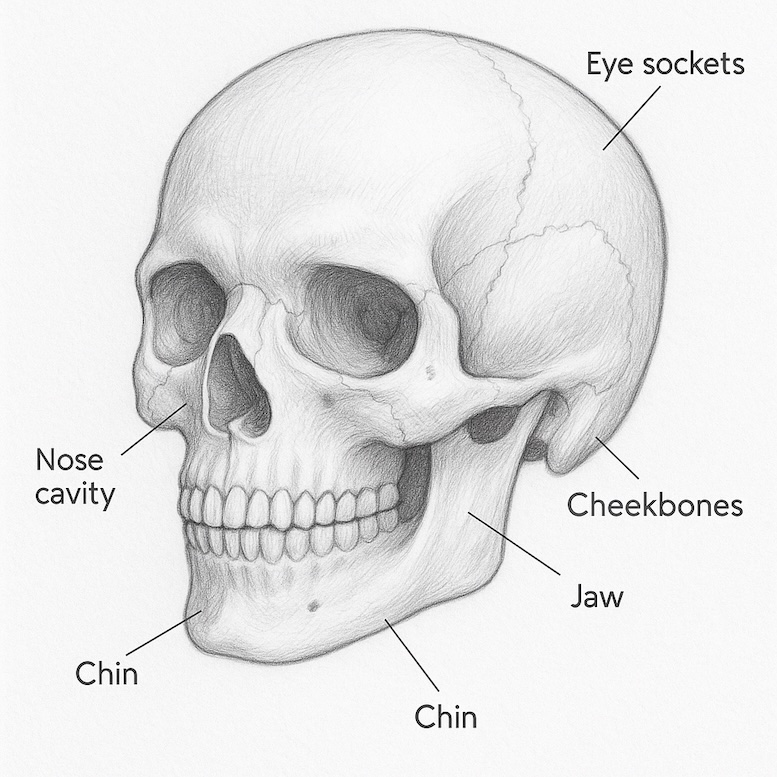
Key points to remember:
- The skull is roughly oval or egg-shaped, wider at the top and narrower at the chin.
- The eye sockets are located near the middle of the head — not at the top, as beginners often think.
- The cheekbones and jawline create the major angles and edges of the face.
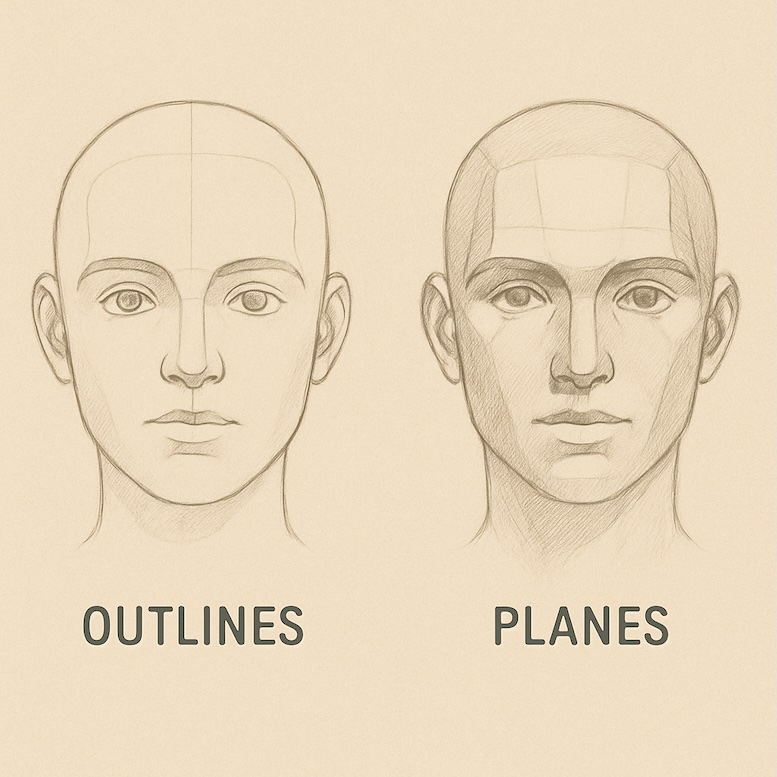
The Planes of the Face: Thinking in 3D
A common mistake is to think of the face as flat. In reality, it’s made of planes — angled surfaces that catch light differently. Recognizing these planes helps you shade the face realistically and avoid the dreaded “flat face” look.
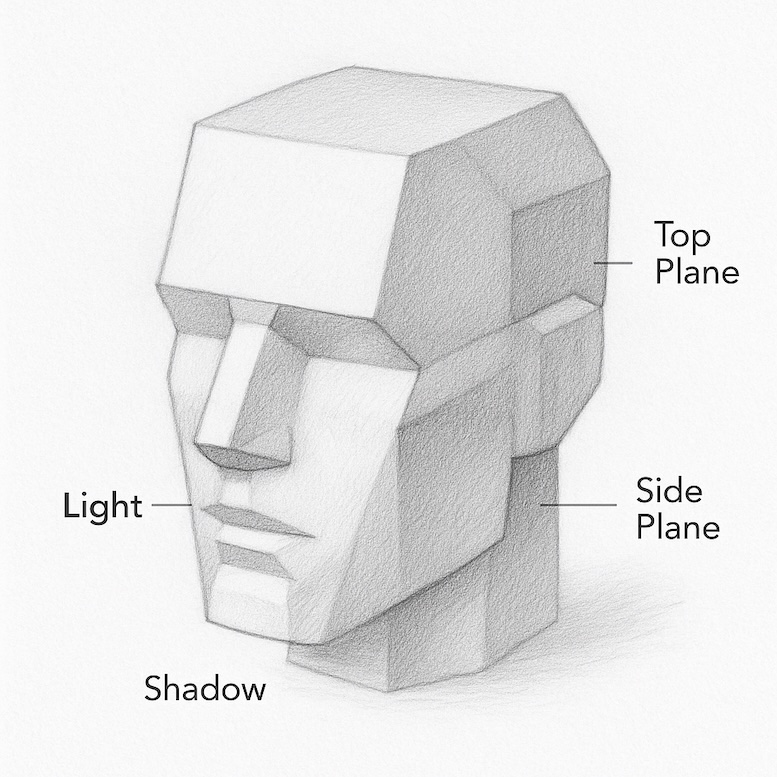
The main planes to observe:
- Forehead plane: slightly rounded, catching the most light from above.
- Mid-face plane: includes the eyes, nose, and upper cheeks, often angled forward.
- Lower face plane: jaw and chin area, which angles downward and creates shadow under the chin.
Muscles & Soft Tissue: Adding Expression
Once you have the skull and planes in place, add the muscles and soft tissues that give the face its unique character and expression.
- Eyebrow muscles (frontalis) control eyebrow movement and create expressions like surprise or anger.
- Cheek muscles (zygomaticus) pull the corners of the mouth up when smiling.
- Jaw muscles define how full or lean a face looks.
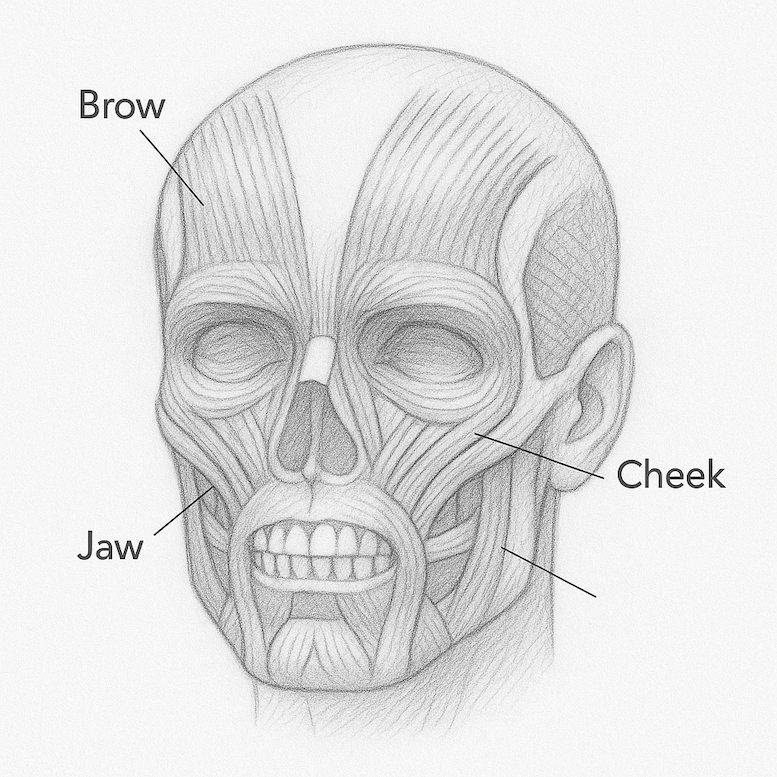
Understanding these muscles helps you exaggerate or relax certain features for lifelike results.
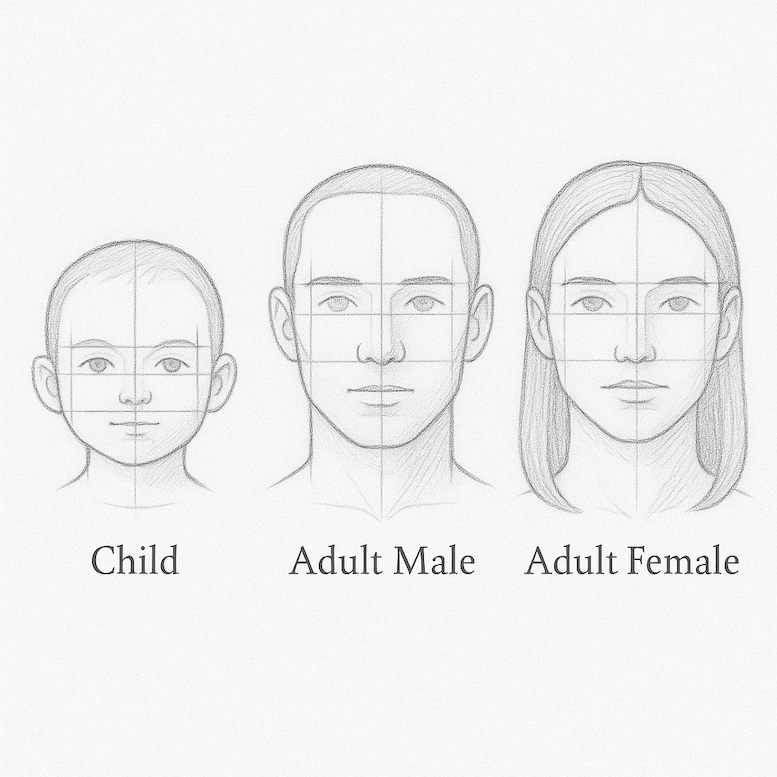
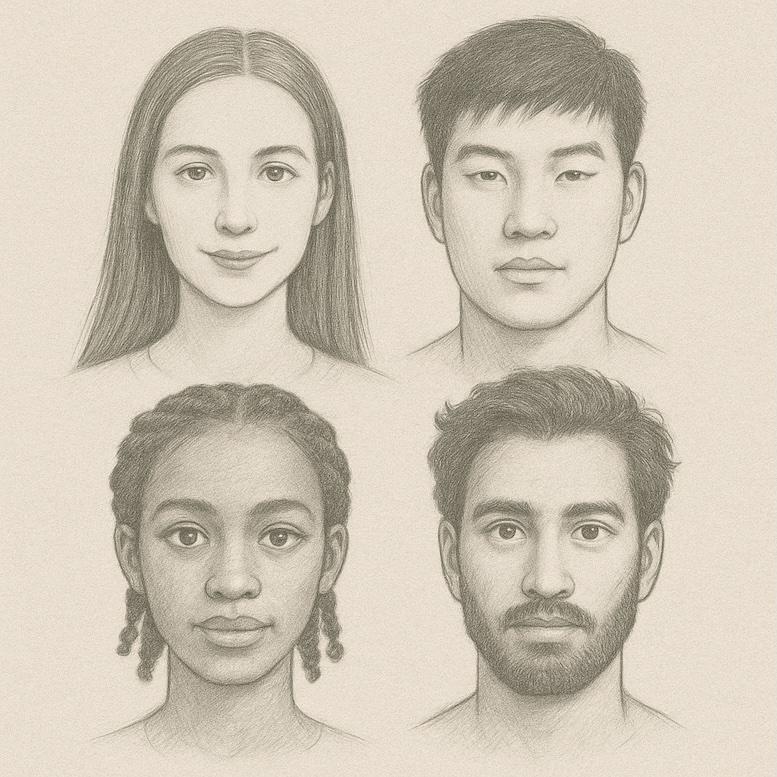
Variations by Age, Gender, and Ethnicity
Faces are not identical — and that’s what makes portrait drawing interesting. To create believable characters, learn how proportions shift:
- Children: bigger cranium, smaller jaw, eyes appear larger.
- Men vs Women: men often have squarer jaws, heavier brow ridges; women typically have softer, rounder contours.
- Ethnic variation: nose shapes, lip fullness, eye shapes, and cheekbone heights can all differ.
By understanding what lies beneath the surface — the skull, planes, muscles, and variations — you set yourself up for success in the next step: learning the exact facial proportions and how to place features accurately.
Proportions – Front View
Learning the correct facial proportions is one of the most important steps when mastering how to draw a face. Proportion gives your drawing balance and realism — without it, even well-drawn features will look “off.”
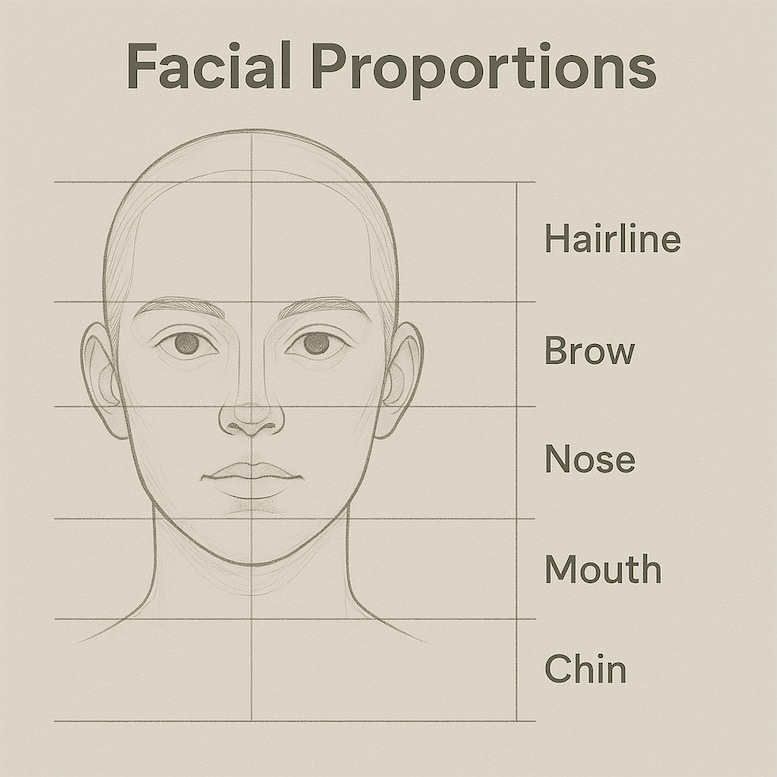
The Classic Proportion Guidelines
Most artists follow a standard set of guidelines (sometimes called the Loomis method) to map out where each feature belongs:
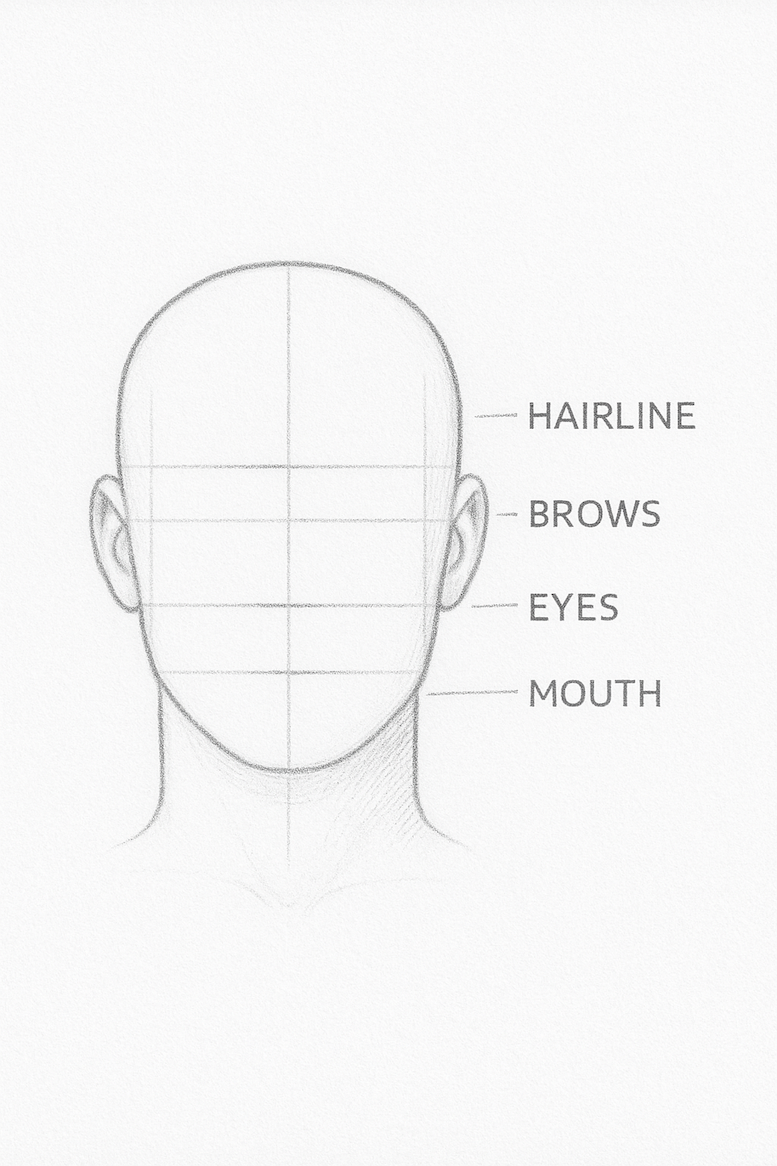
- The Head Shape: Start with an oval shape that is slightly wider at the top and narrower at the chin.
- Eye Line: Divide the oval into two equal halves vertically — the eyes are located halfway between the top of the skull and the chin, not higher.
- Nose Line: Divide the lower half again — the bottom of the nose usually sits at this quarter mark.
- Mouth Line: Divide the space between nose and chin into thirds — the mouth usually falls on the top third line.
- Hairline: The hairline is roughly the same distance from the brow line as the brow line is from the nose.
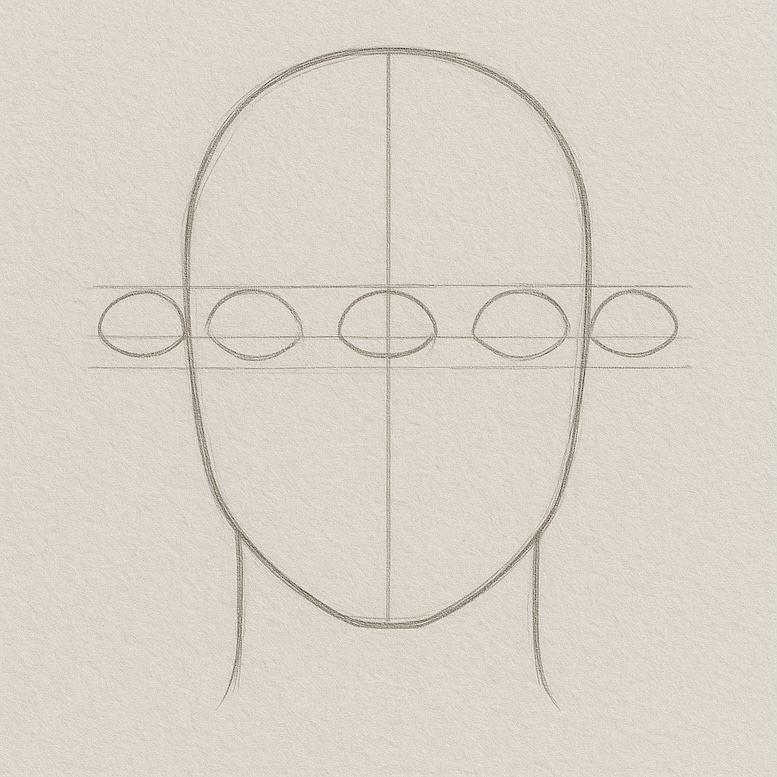
Eye Spacing: The “Five Eyes” Rule
A classic beginner mistake is drawing eyes too close together or too far apart. Use this simple rule:
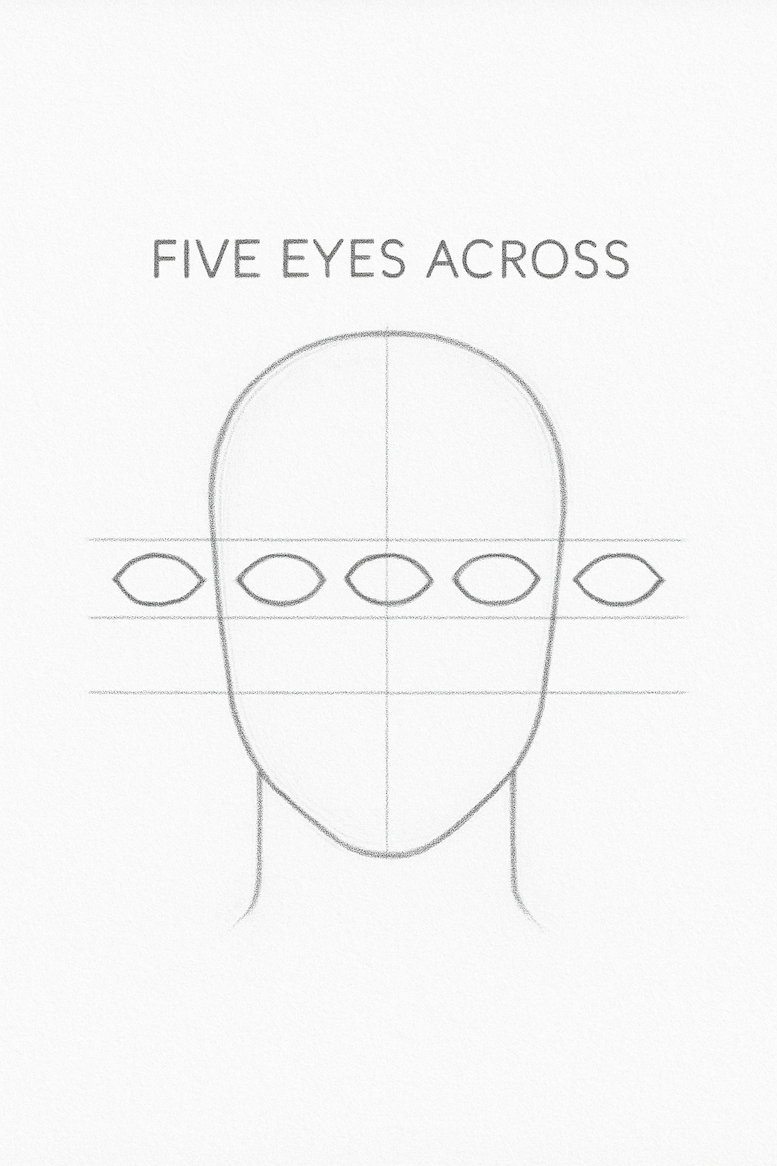
- The face is roughly five eye widths across.
- The space between the eyes is the width of one eye.
- The outer corners of the eyes usually line up with the edges of the nostrils.
Nose & Mouth Placement
Once the eye line is set, the other features fall into place:
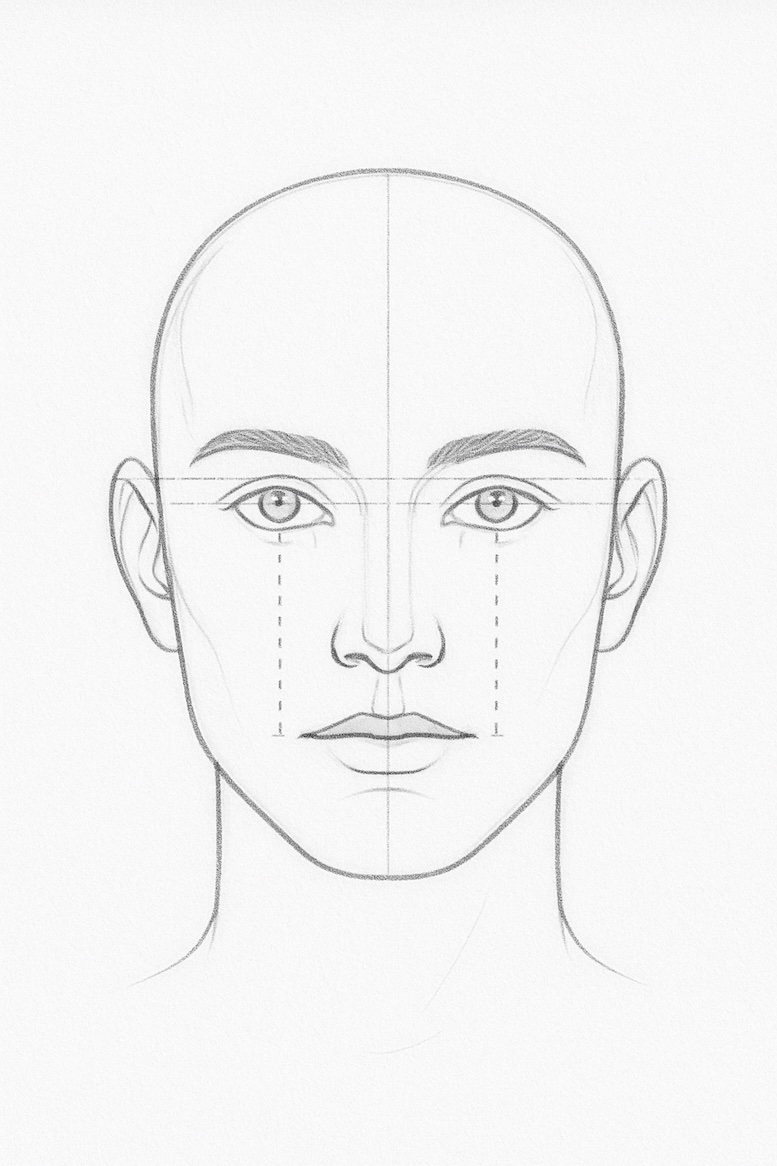
- Nose Width: The sides of the nose line up with the inner corners of the eyes.
- Mouth Width: The corners of the mouth line up roughly with the pupils of the eyes (when looking straight ahead).
- Chin Symmetry: The center of the mouth and nose should align with the center of the chin for balance.
Ears: The Overlooked Feature
Many beginners place ears too high or too low. The rule of thumb:

- Top of the ear aligns with the eyebrow line.
- Bottom of the ear aligns with the bottom of the nose.
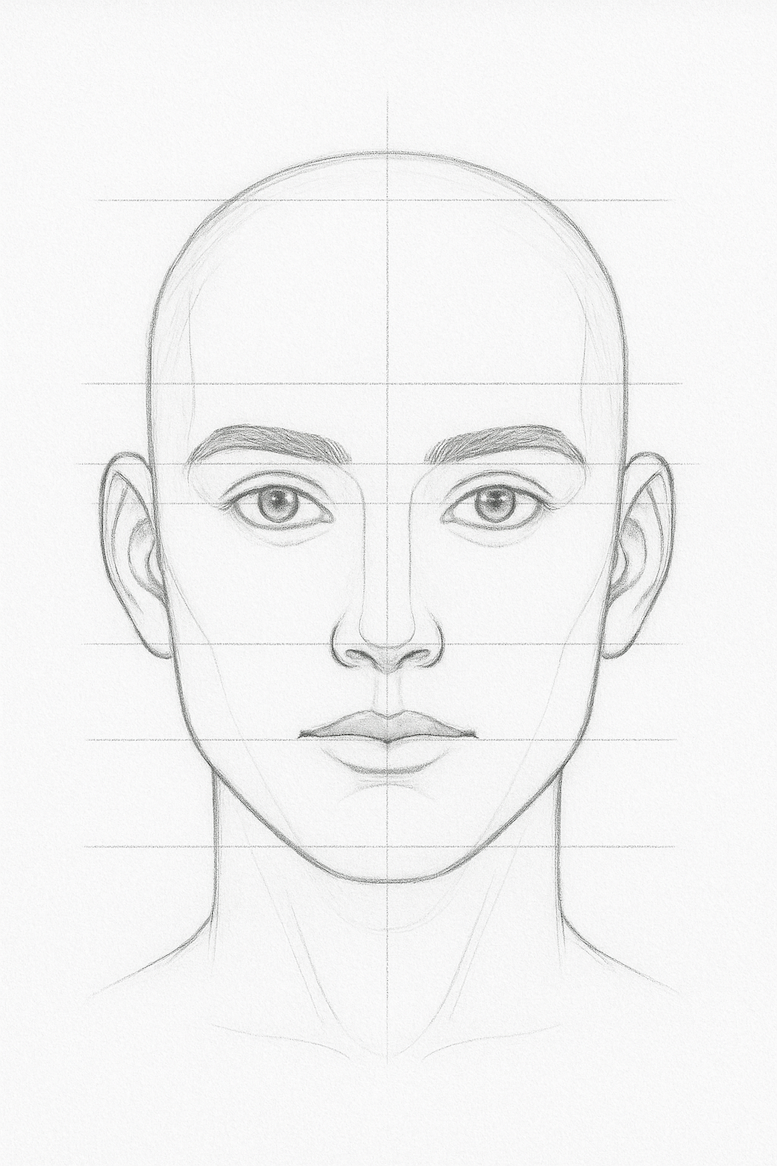
Putting It All Together
By combining these guidelines, you create a perfect “map” of the face before adding any detail. These measurements are flexible — every face is unique — but they provide a strong starting point for realistic portrait drawing.
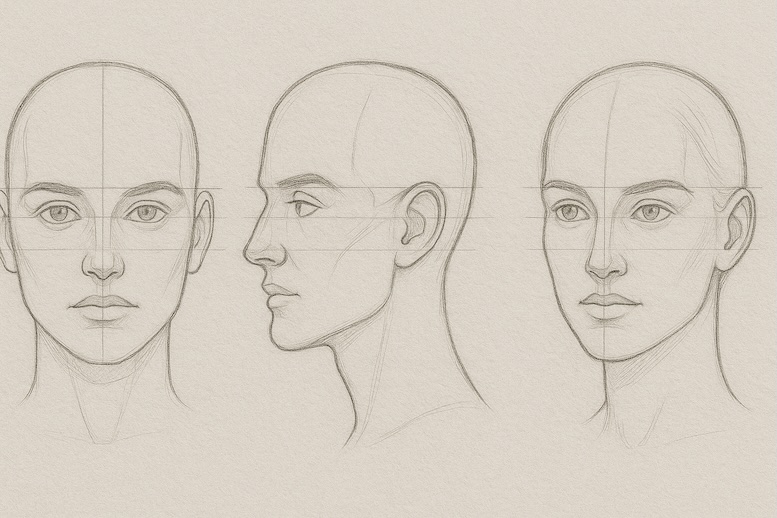
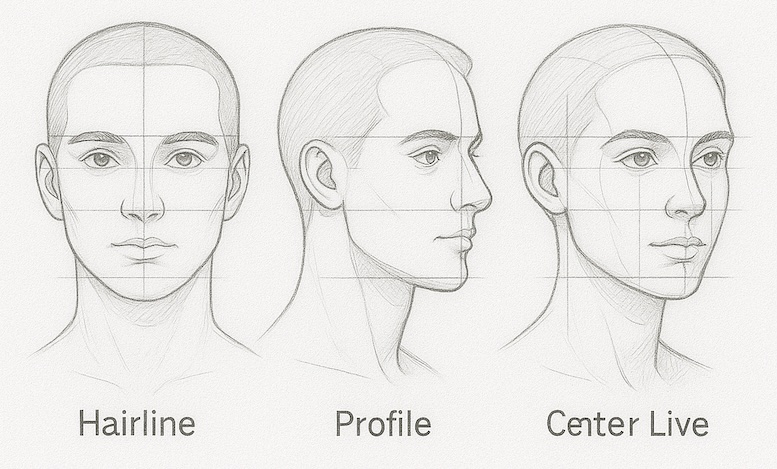
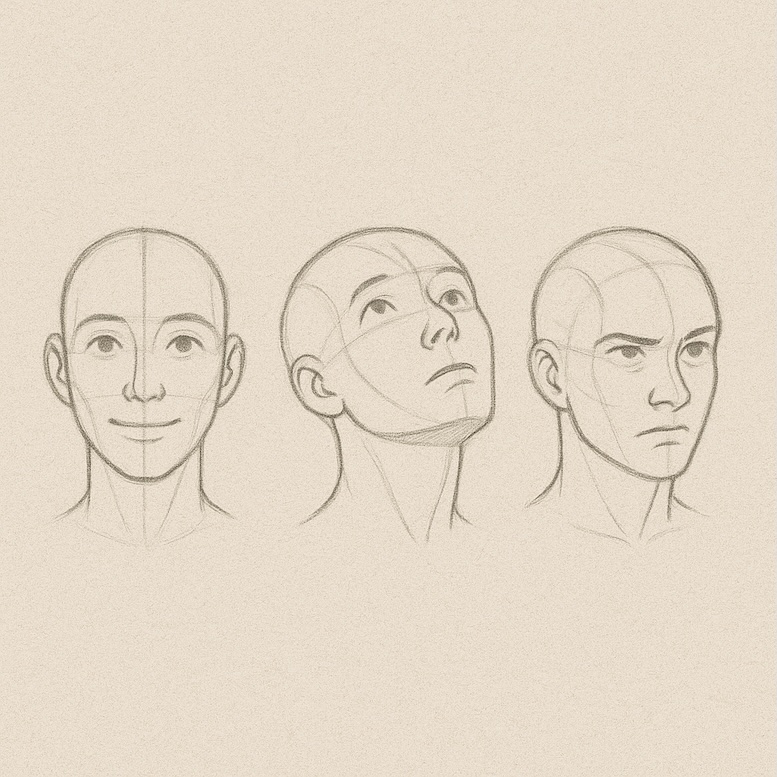
Proportions – Profile & ¾ View
Once you’ve mastered the front view proportions, it’s time to take your drawings to the next level by learning how to draw faces from the side (profile) and three-quarter (¾) view. These angles bring your portraits to life, but they also introduce new challenges — especially with alignment and depth.
Profile View (Side View)
Drawing a face in profile means you’re seeing the full outline of the head and only one side of the features. Here’s what to watch for:
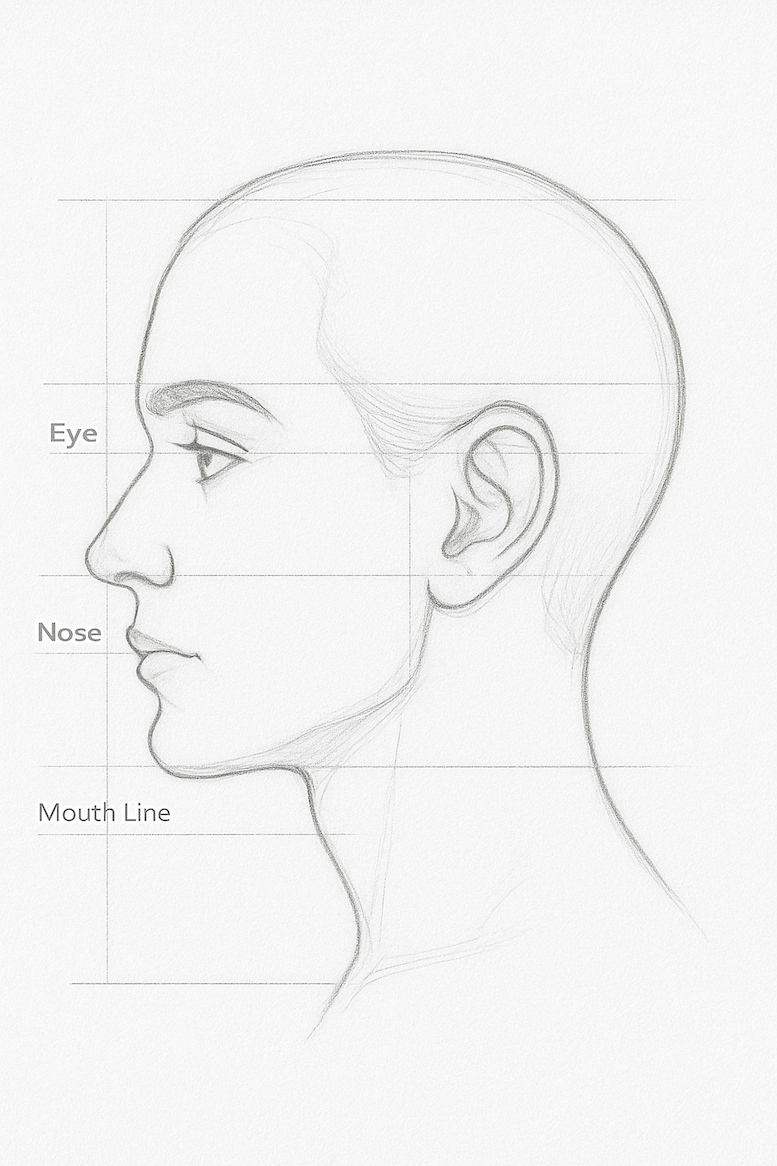
- Overall Shape: The head still follows an oval shape, but the back of the skull becomes more visible and rounded.
- Eye Placement: The eye sits roughly halfway between the front of the face and the back of the skull — but now it appears almond-shaped and narrower.
- Nose Projection: The nose becomes the most prominent feature. Its tip usually aligns vertically with the forehead line, creating a continuous curve.
- Mouth & Chin: The lips project slightly outward. The upper lip typically overhangs the lower lip. The chin should connect smoothly to the lower lip and jawline.
- Ear Placement: The ear still lines up between the brow and nose, but you’ll now see its full shape and angle.
The Three-Quarter View (¾ View)
This is the most dynamic and commonly used angle in portrait drawing. It gives a sense of depth and personality but can feel tricky.
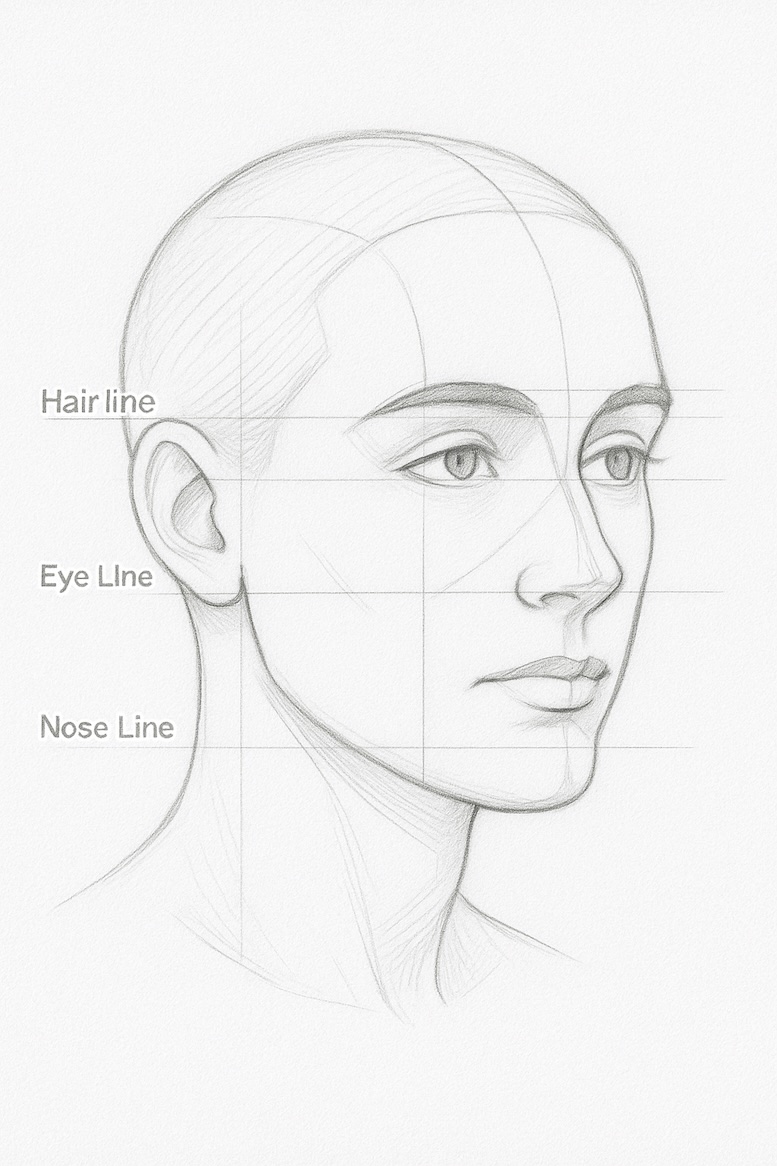
- Center Line: Start by drawing a vertical curve down the middle of the face to show which side is turned toward the viewer.
- Feature Alignment: All features follow this curve — the nose, mouth, and chin shift toward the far side.
- Near vs Far Side: The near eye appears wider, the far eye slightly narrower due to perspective.
- Jawline: The far side of the jaw is partly hidden, creating a natural overlap that adds realism.
- Ears & Hair: The ear still aligns with brows and nose but may be partly hidden by the head’s turn.
Tips for Maintaining Proportions in Different Angles
- Use Construction Lines: Begin with a circle and add cross-contour lines to keep features aligned.
- Think in 3D: Imagine wrapping the guidelines around a sphere. This helps keep features from “floating” off the face.
- Check Symmetry: Even in angled views, eyes should sit on the same horizontal plane unless the head is tilted up or down.
Mastering profile and ¾ view proportions makes your drawings look dynamic and natural. Once you feel comfortable with head construction from all angles, you can move on to drawing facial features in detail — the next step to adding personality to your portraits.
Features in Detail – Shape Variations & Nuances
Once you have your head proportions mapped out, it’s time to bring the face to life by focusing on each facial feature individually. The key to realistic portrait drawing is learning to draw eyes, noses, lips, and ears with accuracy — and capturing their subtle differences from person to person.
Eyes: The Windows to the Soul
Eyes are often the focal point of a portrait, so getting them right is crucial.
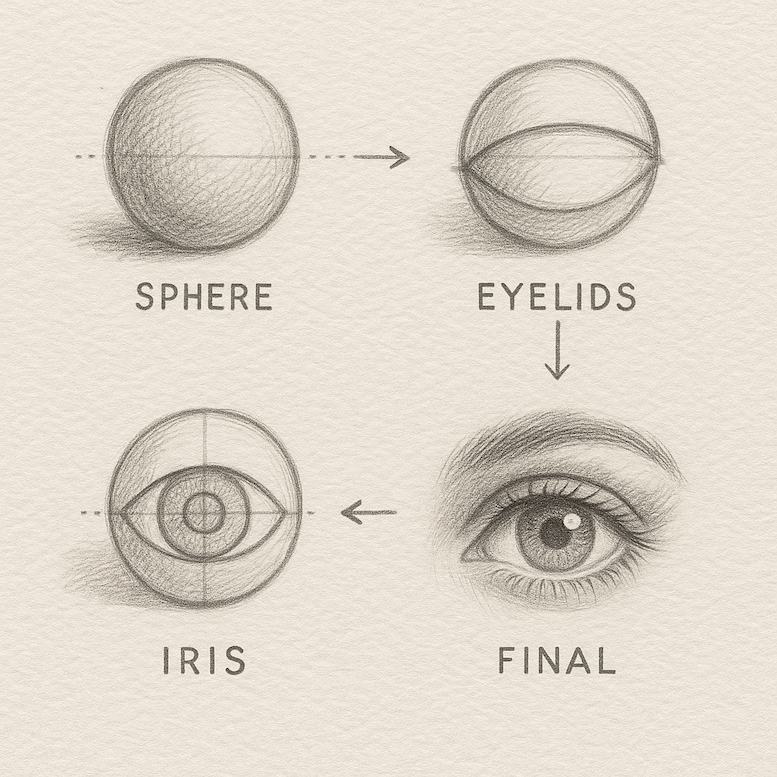
- Basic Shape: The eye is not a flat almond; it’s a three-dimensional sphere sitting inside the eye socket.
- Upper & Lower Eyelids: The upper lid usually overlaps slightly over the eyeball, creating a shadow. The lower lid is more subtle and has a softer curve.
- Iris & Pupil: Always draw the iris as a full circle, even when partially covered by the eyelid. Add highlights to make the eye look alive.
- Eyebrows: Follow the brow ridge’s natural curve — thicker near the nose, tapering toward the temple.
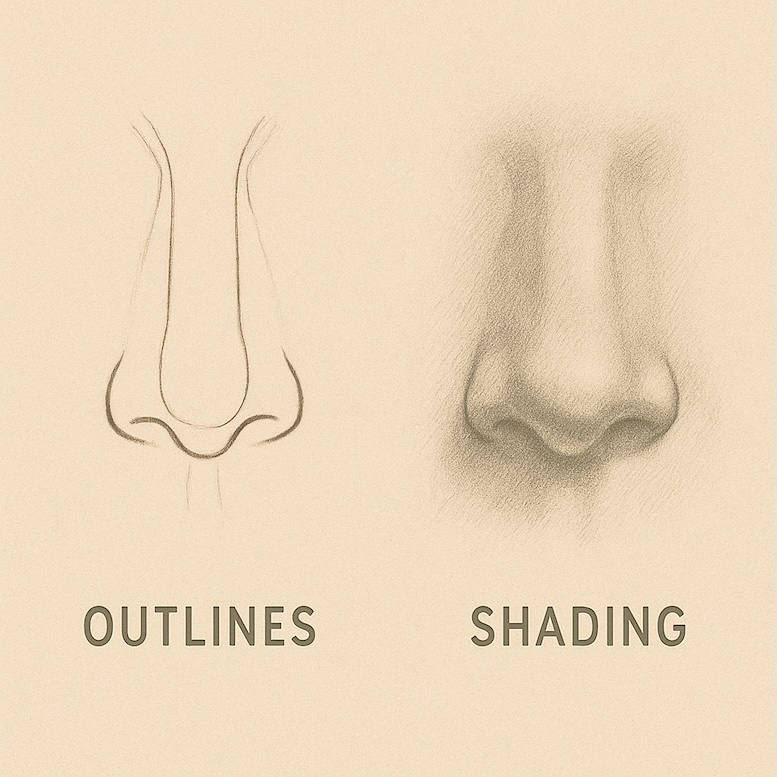
Noses: Structure and Style
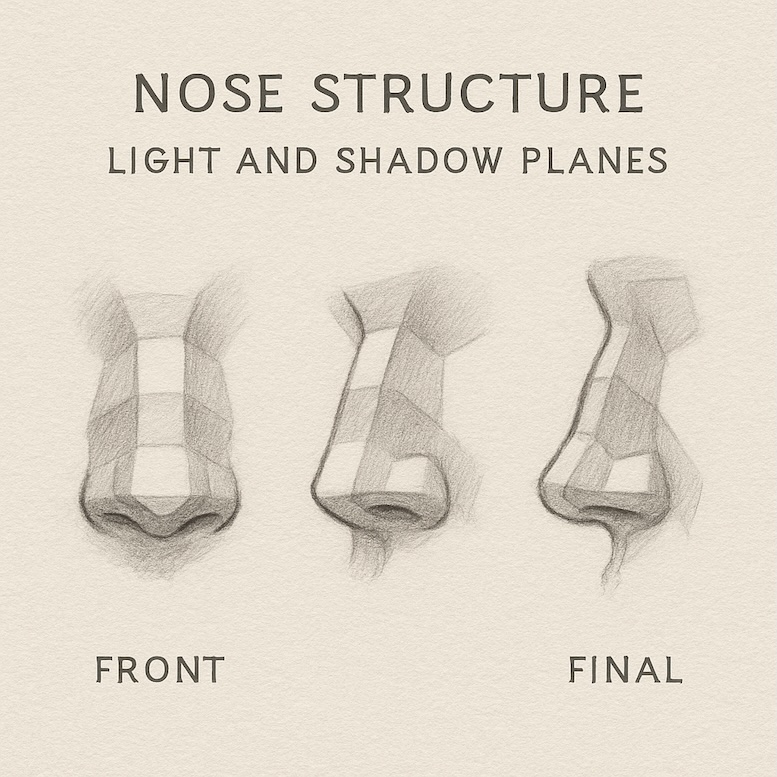
The nose is one of the trickiest features because it doesn’t have hard lines — it’s made up of planes and soft transitions.
- Bridge: Begins between the eyes and slopes downward.
- Nostrils & Tip: The tip of the nose is rounded, with nostrils forming a triangular shape when seen from the front.
- Shadows: Emphasize shading rather than outlines to keep the nose realistic.
- Variations: Wide, narrow, long, short — practice different shapes to build versatility.
Lips & Mouth: Expressive Features
The mouth is key to capturing expression.

- Basic Construction: Start with a horizontal center line, then build the upper and lower lips around it.
- Upper Lip: Usually thinner, shaped like an “M” or cupid’s bow.
- Lower Lip: Fuller and catches more light, creating a highlight.
- Corners of the Mouth: Don’t forget to show the curve of the lips wrapping around the teeth.
- Expressions: Subtle curve changes can turn a neutral mouth into a smile, frown, or smirk.
Ears: The Most Overlooked Feature
Many artists skip details in ears — but well-drawn ears make a portrait look complete.
![]()
- Basic Shape: Ears are shaped like a letter “C” with multiple folds inside.
- Landmarks: Helix (outer rim), antihelix, tragus, and earlobe are the key parts to include.
- Angle: Ears tilt slightly backward and are rarely perfectly vertical.
Hairline & Hair: Framing the Face
Hair can change the entire mood of a portrait.
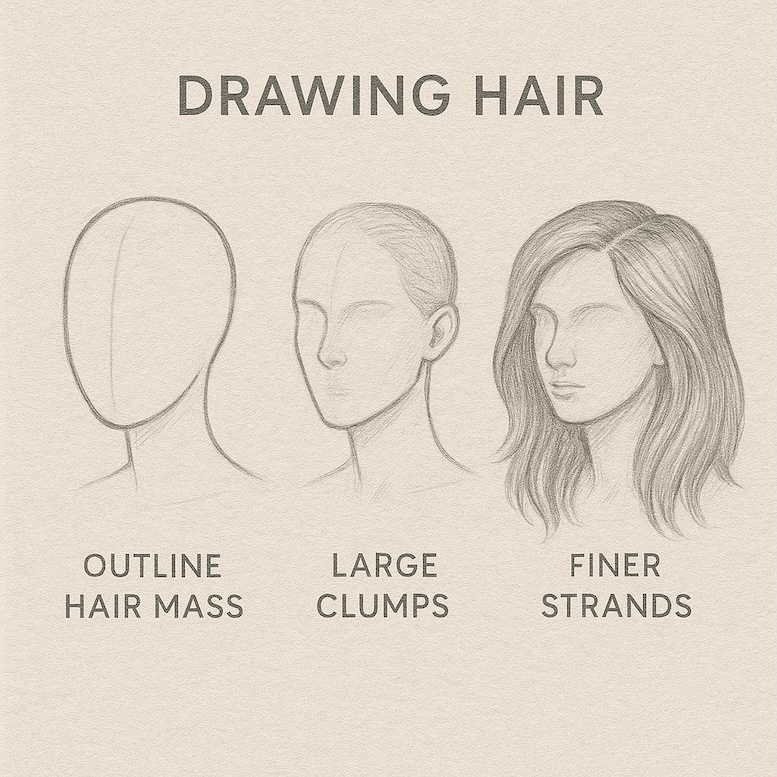
- Hairline Placement: Use the hairline proportion line from earlier to position it correctly.
- Volume: Don’t draw individual strands everywhere — think in clumps and shapes first, then add texture.
- Flow: Follow the natural direction of hair growth and gravity for a more realistic look.
By learning the construction and subtle variations of each facial feature, your portraits will look more natural, expressive, and believable. In the next section, we’ll explore how to combine these features with expression, age differences, and character design to make faces even more lifelike.
Expression, Age & Character Differences
A technically accurate face is good, but a face that feels alive is unforgettable. To make your portraits compelling, you need to learn how to show emotion, age, and individuality through subtle changes in features and proportions.
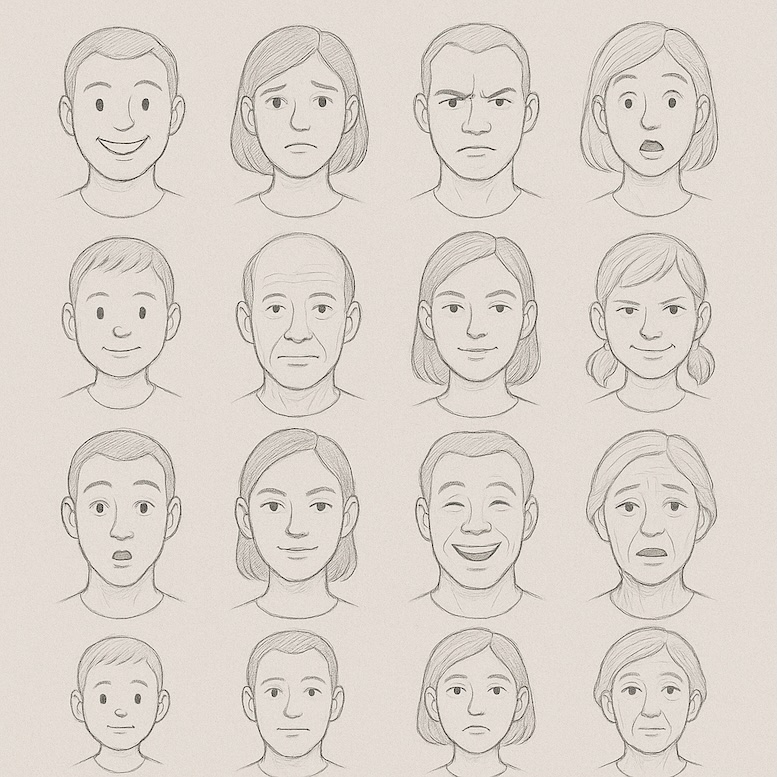
Facial Expressions: Bringing Portraits to Life
Expressions are created by the interaction of facial muscles. Slight adjustments to the brows, eyes, and mouth can completely change the mood of a drawing.
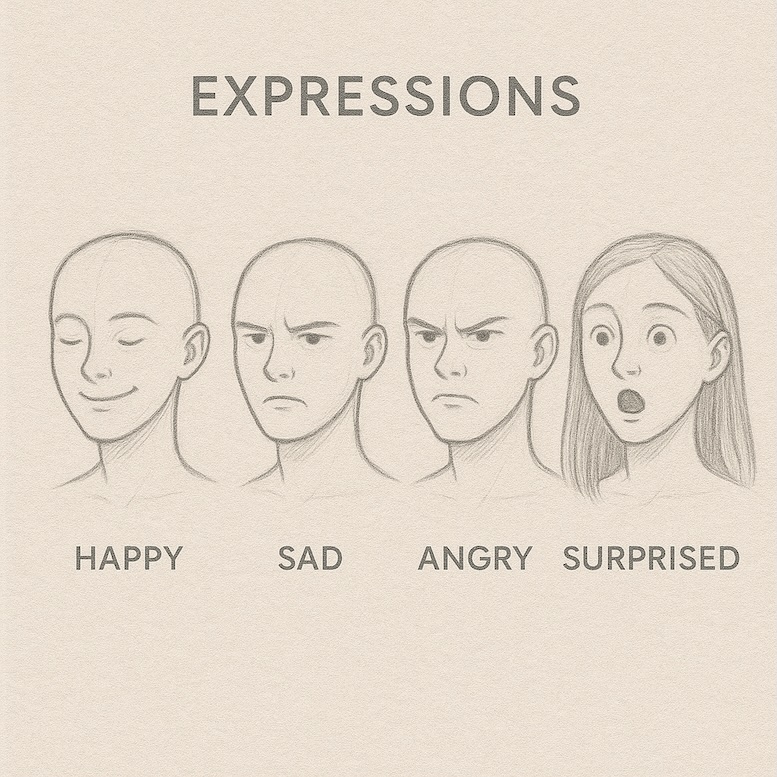
- Happy / Smiling: Eyebrows lift slightly, eyes squint, and the corners of the mouth curve upward.
- Sad: Eyebrows angle upward near the center, eyelids droop, and mouth corners turn down.
- Angry: Eyebrows angle downward and inward, eyes narrow, and lips press together.
- Surprised: Eyebrows raise high, eyes widen, and mouth opens slightly.
Age Differences: Drawing Children vs. Adults
Age dramatically changes the proportions of the face. Recognizing these changes makes your drawings more convincing.
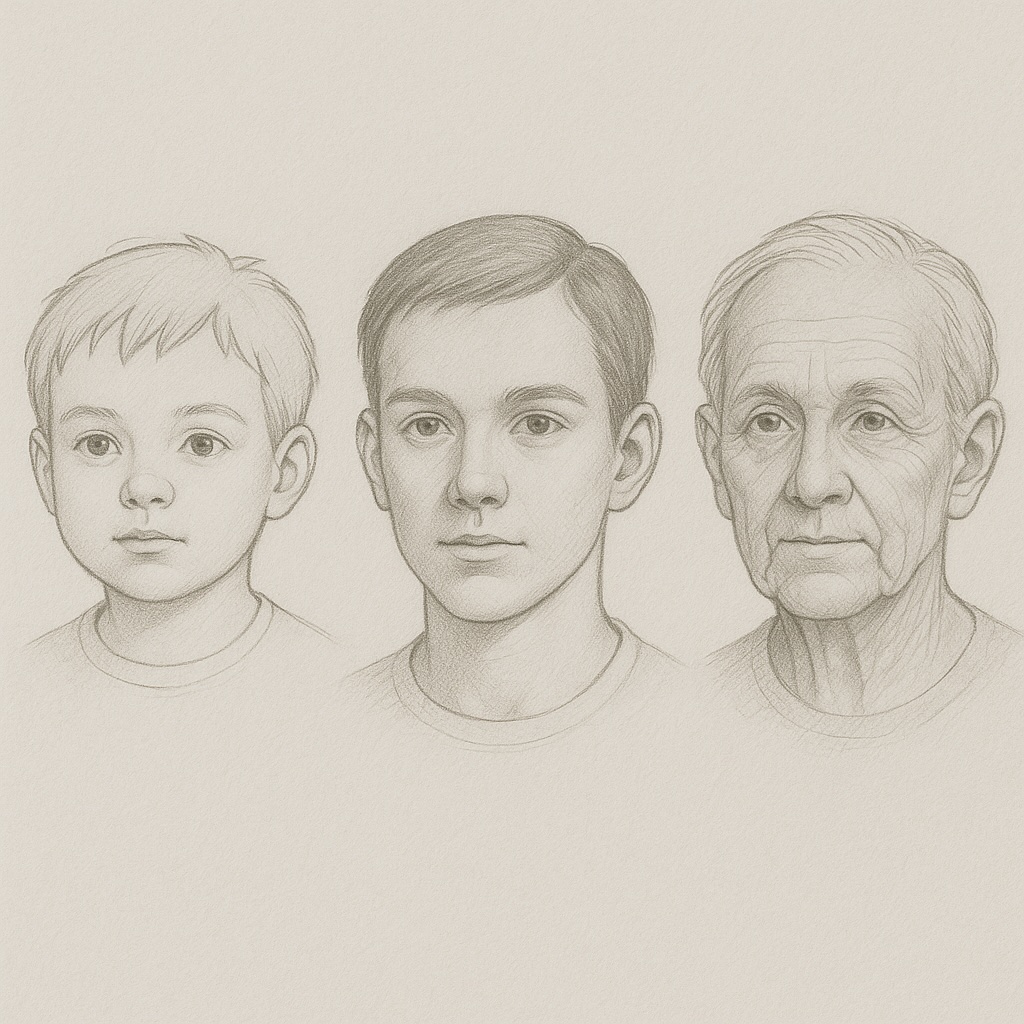
- Children: Larger cranium relative to face, smaller jaw, big round eyes, and softer features.
- Teens: The jawline sharpens, nose bridge lengthens, and proportions start to approach adult ratios.
- Older Adults: Wrinkles appear along expression lines, eyelids may droop, lips thin, and jawline softens.
Ethnic & Character Diversity
Every face is unique, and understanding diversity helps create more authentic and inclusive portraits.
- Ethnic Features: Pay attention to differences in nose shape, eye folds, lip fullness, and cheekbone height.
- Character Design: Exaggerate or soften features to create specific personalities — heroic, villainous, shy, confident.
- Stylization: Use realistic proportions as a base, then adjust slightly for cartoon, semi-realistic, or caricature styles.
Practice Tip: Build an Expression Library

One of the best exercises is to sketch quick faces with different emotions. This helps you memorize how muscles shift and gives you a reference for future portraits.
By mastering expressions, age differences, and character variety, you transform your portraits from static drawings into storytelling images full of personality. In the next section, we’ll explore perspective, light, and shading — crucial tools for adding depth and realism to every face you draw.
Perspective, Light & Shading
Even perfectly proportioned features can look flat if you don’t add depth. Perspective, light, and shading are the secret weapons that turn a simple face sketch into a realistic portrait.
Perspective: Drawing the Head in 3D
Understanding perspective helps you place features accurately when the head tilts, turns, or looks up/down.
- Foreshortening: When the head tilts toward the viewer, features appear compressed (eyes and nose closer together).
- Vertical Tilt: Tilt up (worm’s-eye view) shows more under the chin and nostrils; tilt down (bird’s-eye view) shows more of the top of the head.
- Center Line: Always draw a curved vertical center line across the face to keep features aligned on a tilted head.
Understanding Light Sources
Light direction completely changes the mood of a portrait. Study how shadows fall when light comes from different angles:

- Front Lighting: Flattens features and creates soft shadows — good for beginners.
- Side Lighting: Adds drama by casting strong shadows on one side of the face.
- Top Lighting: Creates natural shadows under brows, nose, and chin (common in daylight).
- Bottom Lighting: Produces eerie, unnatural effects (great for dramatic or horror illustrations).
Shading Techniques for Realistic Faces
Once you know where light and shadow fall, use shading to add volume and dimension:
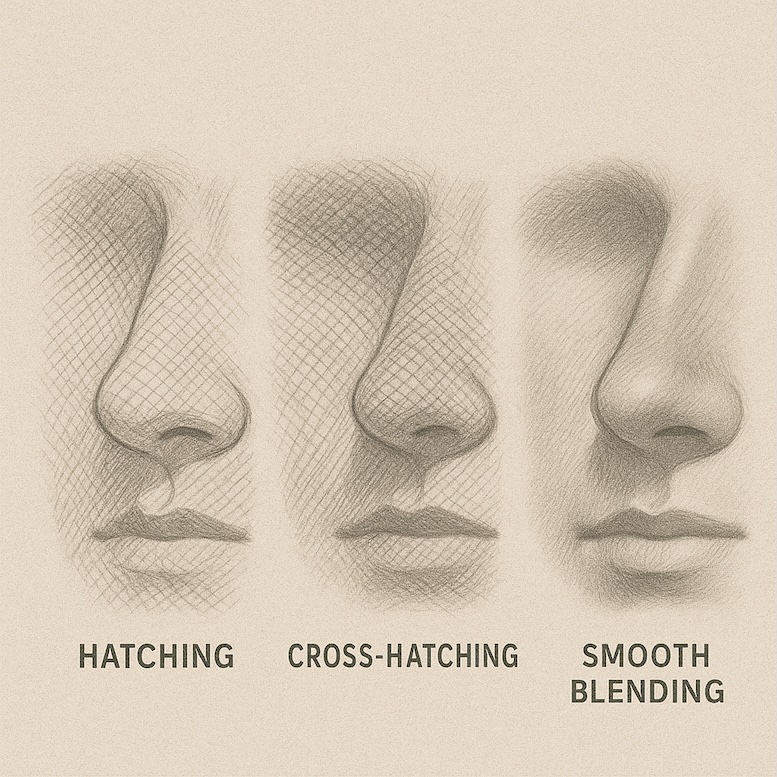
- Hatching: Parallel lines that follow the form of the face.
- Cross-Hatching: Overlapping sets of lines for deeper shadows.
- Blending: Use a blending stump or tissue for smooth gradients (great for skin tones).
- Value Gradation: Always work from light to dark — preserve highlights for realism.
Key Shadow Areas to Focus On
To make a face pop off the page, pay attention to:

- Under the eyebrows and nose bridge
- Beneath the nose tip and around nostrils
- Under the lower lip (small shadow above chin)
- Cheek hollows under cheekbones
- Cast shadow under the jawline on the neck
Highlights: The Final Touch
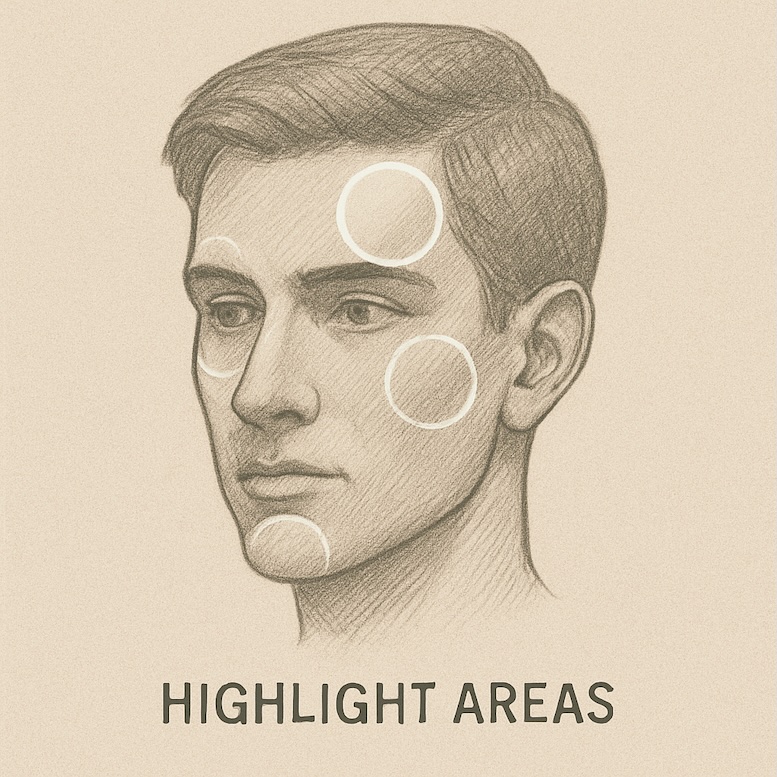
Don’t forget to leave areas of paper white or lightly shaded where light hits directly — the tip of the nose, top of cheekbones, forehead, and lips often have subtle highlights. These bright spots add realism and make skin look luminous.
By mastering perspective, light direction, and shading techniques, you add depth and realism that make your portraits look professional. The next section will focus on common mistakes and how to fix them, helping readers troubleshoot and improve quickly.
Common Mistakes & How to Fix Them
Even with careful guidelines, many artists find their face drawings look “off.” The good news? Most mistakes are common and easy to correct once you know what to look for. This section will help beginners troubleshoot their work and improve fast.
Mistake 1: Misplaced Eyes
The Problem: Eyes are often drawn too high on the head or too far apart. The Fix: Always divide the head shape in half vertically — the eyes should sit halfway between the top of the skull and the chin. Use the five-eye rule for spacing.
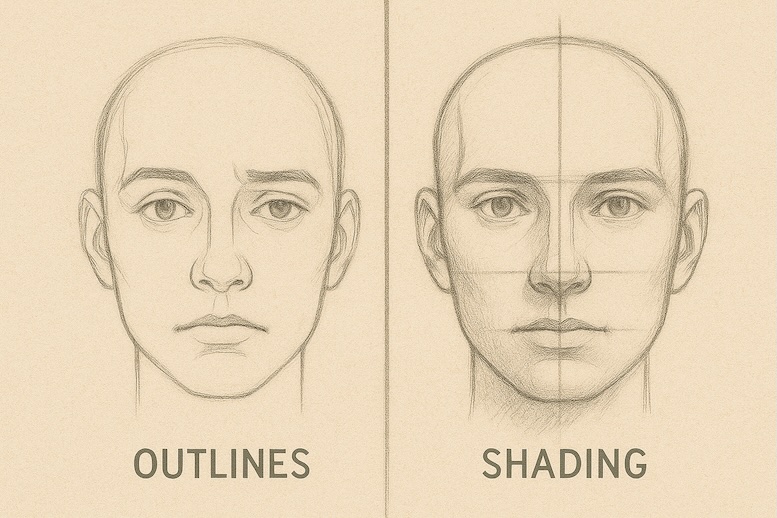
Mistake 2: Flat Faces
The Problem: The face looks two-dimensional, with no sense of depth. The Fix: Think in planes. Add shading to show volume — cheekbones, brow ridges, and jawline should all have subtle shadow/light contrast.
Mistake 3: Nose Drawn as Simple Lines
The Problem: A “cartoonish” nose that looks pasted on the face. The Fix: Focus on shadows, not outlines. Indicate the bridge, nostrils, and tip using light and dark shapes rather than harsh lines.
Mistake 4: Uneven Features (Asymmetry)
The Problem: One eye higher than the other, mouth tilted unintentionally. The Fix: Use a vertical center line and horizontal guidelines for all features. Constantly flip your drawing (or check in a mirror) to spot imbalances.
Mistake 5: Over-Shading or Smudging
The Problem: The portrait looks muddy or dirty. The Fix: Build up shading gradually, layer by layer. Use clean paper under your hand to avoid smudges and keep highlights intact.
Mistake 6: Ignoring the Neck & Hair
The Problem: A well-drawn face that “floats” without a proper neck or hair volume. The Fix: Always include the neck and shoulders to ground the portrait. Add hair as large shapes first before detailing strands.
By addressing these common mistakes, beginners can see immediate improvement. The more you analyze and adjust your own work, the faster your portraits will start to look realistic and professional.
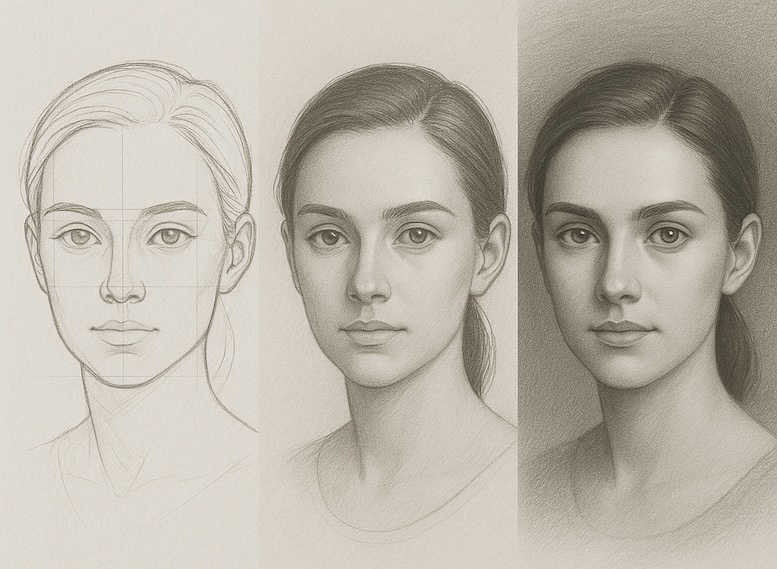
Step-by-Step Tutorials – From Sketch to Finished Portrait
Now that you know proportions, anatomy, and shading, it’s time to put everything together. Follow these step-by-step tutorials to draw faces from front, profile, and ¾ view. These walkthroughs will help beginners build confidence and give intermediate artists a structured way to refine their technique.
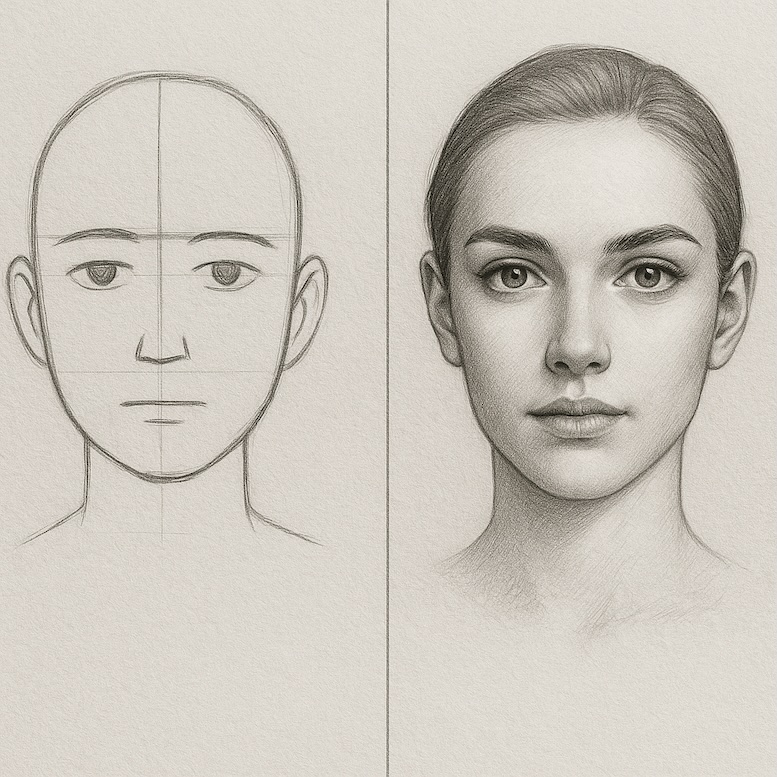
Tutorial 1: Front View Portrait
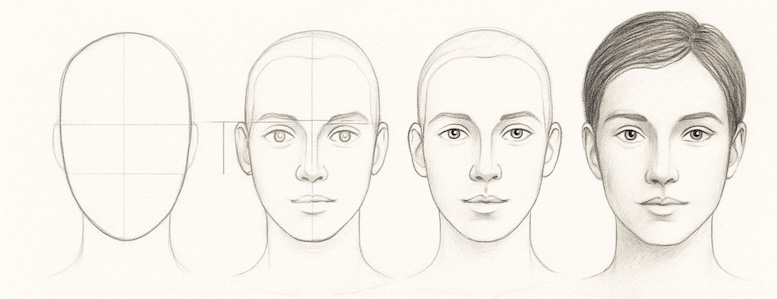
Step 1: Draw the Head Shape Start with a light oval or egg shape, slightly narrower at the chin.
Step 2: Add Guidelines Draw a vertical center line and horizontal lines for hairline, eyebrows, eyes, nose, and mouth.
Step 3: Sketch the Features Block in the eyes (using the five-eye rule), nose, mouth, and ears. Keep lines light and simple.
Step 4: Refine the Features Add eyelids, nostrils, lips’ curves, and eyebrows. Clean up construction lines.
Step 5: Shade & Add Details Work on light source and shadow placement. Add hair, refine edges, and build depth gradually.
Tutorial 2: Profile View Portrait
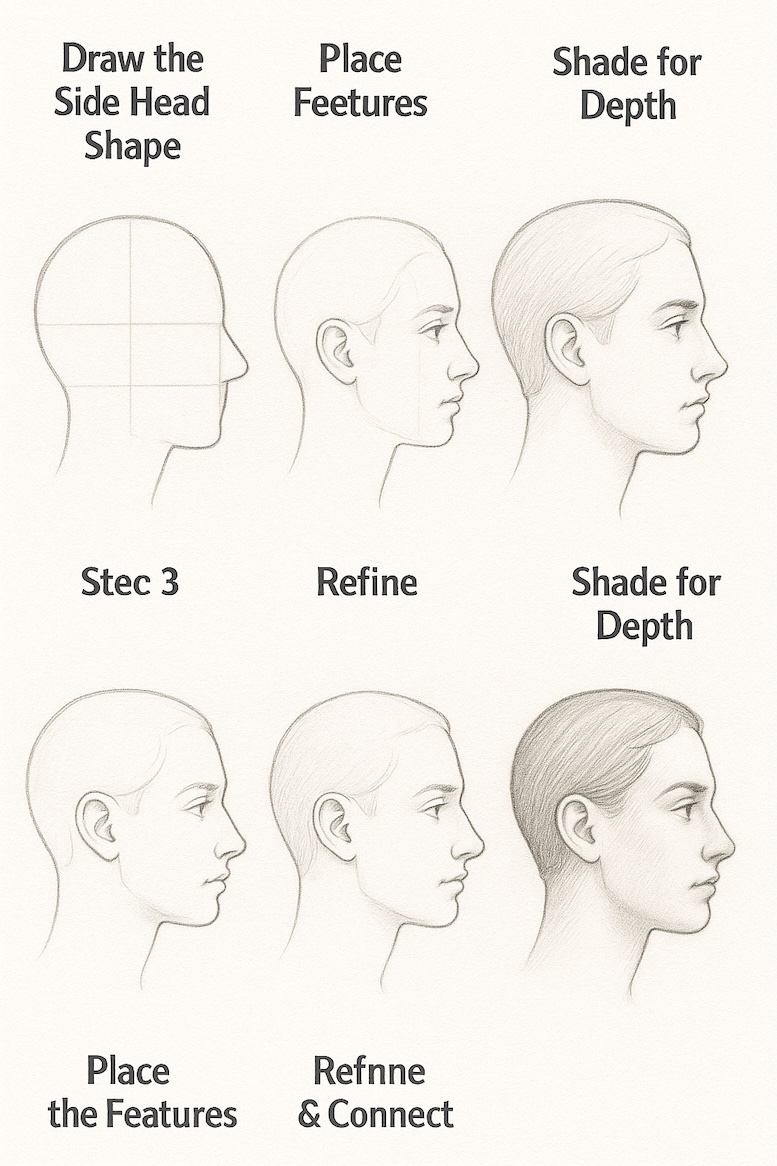
Step 1: Draw the Side Head Shape Begin with a circle for the cranium and add a jawline extending forward.
Step 2: Add Guideline Grid Draw a vertical line for the front of the face and horizontal lines for eyes, nose, mouth, and chin.
Step 3: Place the Features Add the eye (almond-shaped from side), nose projection, lips, and ear (between brows and nose).
Step 4: Refine & Connect Smoothly connect nose bridge, lips, and chin. Add neck and hairline.
Step 5: Shade for Depth Emphasize shadows under chin, behind jaw, and in eye socket to create volume.
Tutorial 3: ¾ View Portrait
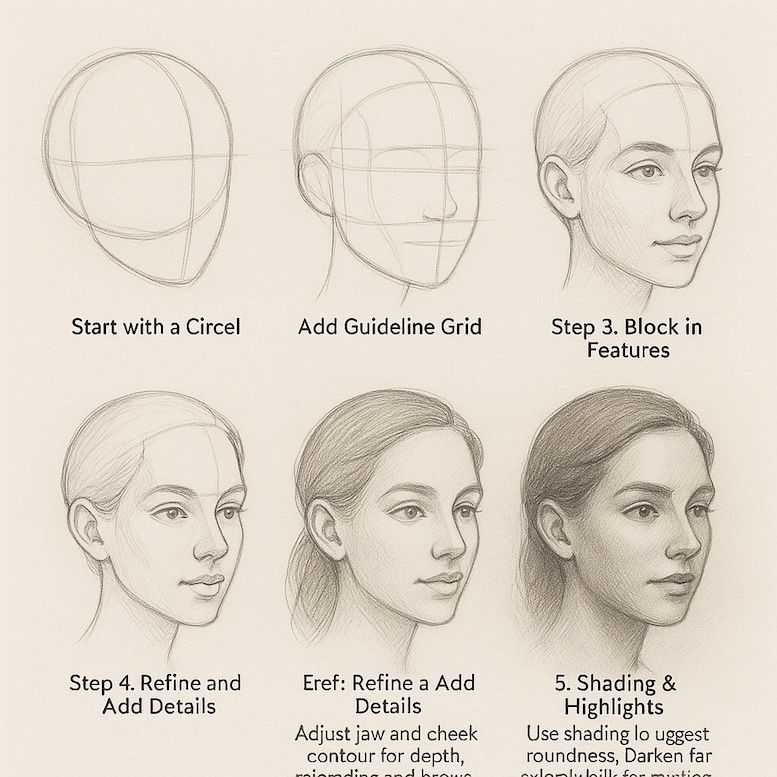
Step 1: Start with a Circle Draw a circle and add a curved vertical line to indicate which side faces the viewer.
Step 2: Add Guideline Grid Wrap horizontal guidelines around the face (eye line, nose line, mouth line).
Step 3: Block in Features Place near eye slightly larger, far eye narrower, and align nose and mouth along the curved center line.
Step 4: Refine and Add Details Adjust jaw and cheek contour for depth, refine lips and brows, add ear on visible side.
Step 5: Shading & Highlights Use shading to suggest roundness. Darken far side slightly for realism and leave highlights on near cheekbone.
Pro Tips for All Angles
- Start with light construction lines so they can be easily erased.
- Work from big shapes to small details — don’t get lost in eyelashes too soon.
- Keep checking symmetry by flipping your paper (or mirroring digitally).
- Practice multiple heads in quick succession to build muscle memory.
By practicing these three tutorials regularly, you’ll train your eye to see and draw accurate proportions naturally. The next section will give you tools, materials, and techniques to make the process smoother and more enjoyable — whether you work traditionally or digitally.
Tools, Materials & Techniques
The right tools can make a huge difference when learning how to draw a face. Whether you’re sketching traditionally or working digitally, using the correct materials helps you achieve clean lines, smooth shading, and professional-looking results.
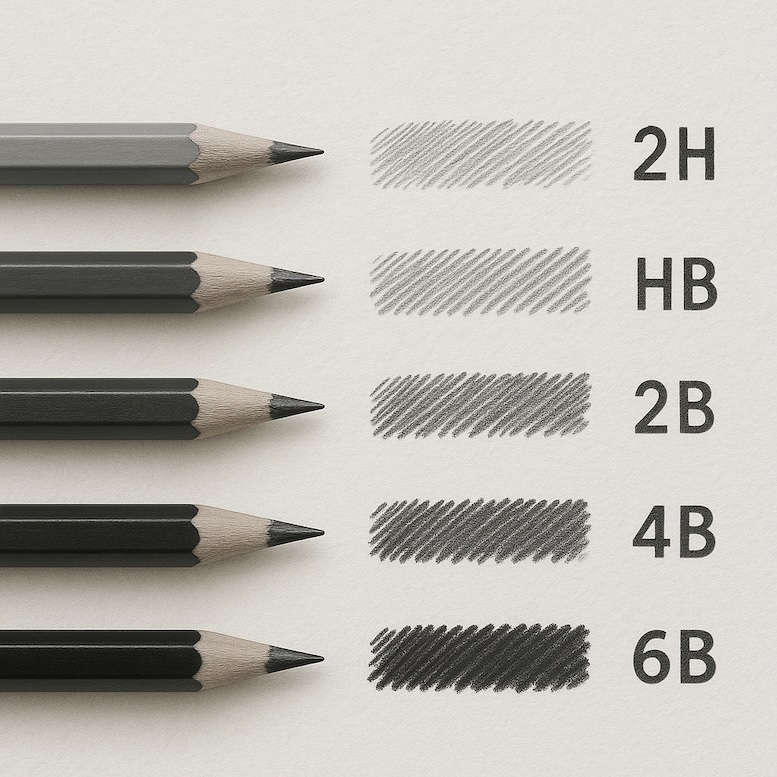
Pencils & Drawing Tools
- Graphite Pencils: A full set from 2H (hard, light lines) to 6B (soft, dark shading) is ideal.
- Mechanical Pencils: Great for fine construction lines that stay consistent in thickness.
- Charcoal or Graphite Sticks: For rich, deep shadows and expressive sketching.
Paper & Sketchbooks
Choosing the right paper affects your ability to blend and erase.
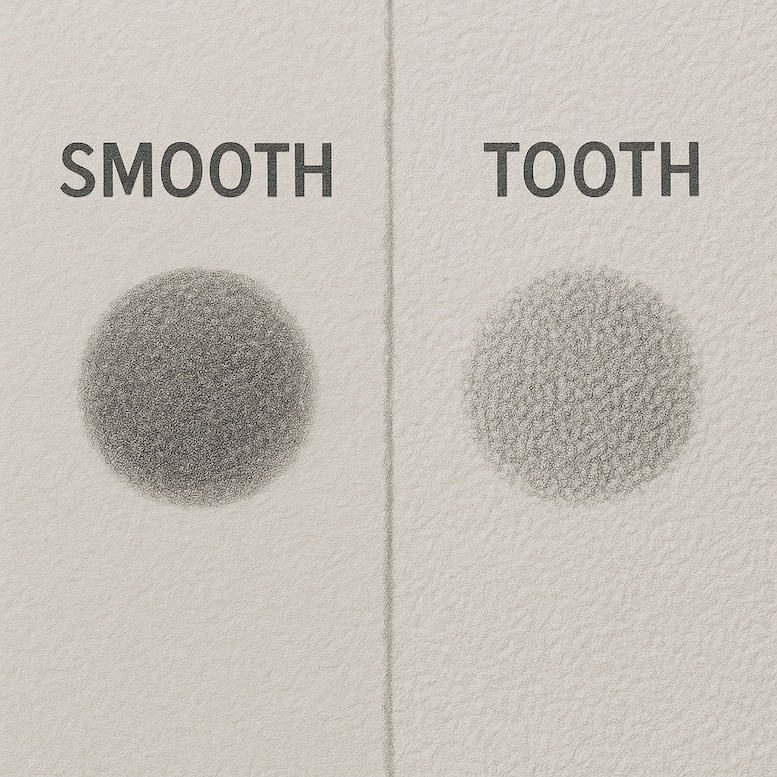
- Smooth Bristol Paper: Excellent for fine details and clean shading.
- Medium-Textured Sketch Paper: Good for practice and quick studies.
- Toned Paper: Perfect for working with white pencils to add highlights.
Erasers & Blending Tools
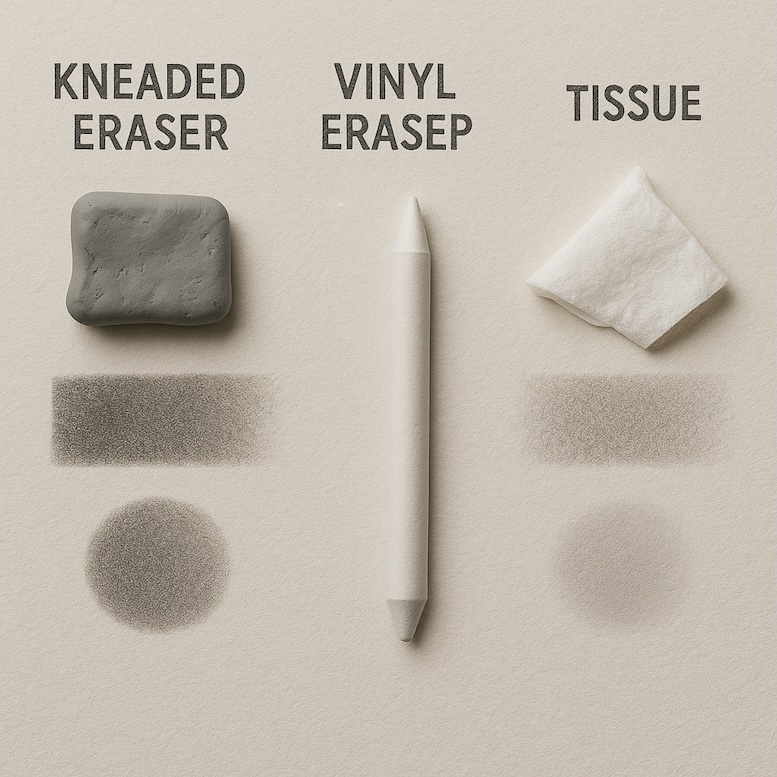
- Kneaded Eraser: Moldable, perfect for lifting graphite without damaging the paper.
- Vinyl Eraser: For crisp, clean highlights.
- Blending Stumps (Tortillons): Essential for smooth gradients and skin shading.
- Tissues or Cotton Swabs: Inexpensive alternatives for blending large areas.
Additional Supplies
- Ruler or Compass: To keep guideline proportions consistent.
- Fixative Spray: Prevents smudging and preserves your finished drawing.
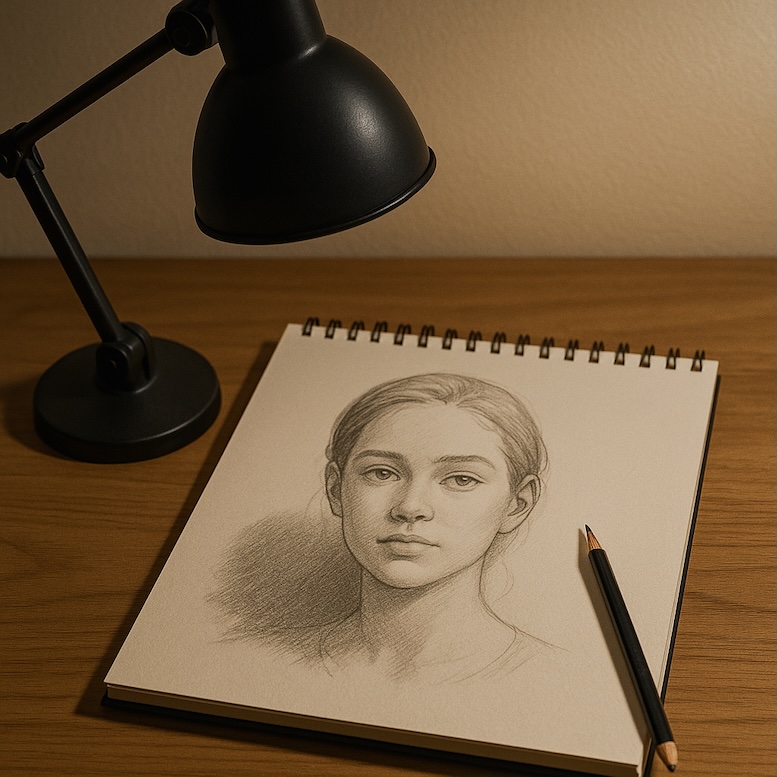
- Desk Lamp: Adjustable light source helps you control shadows while drawing.
Digital Drawing Options
If you prefer to work digitally, many tools mimic the feel of traditional media.
- Drawing Tablets (Wacom, Huion, XP-Pen): Give you precision control and pressure sensitivity.
- Software: Procreate, Photoshop, Krita, or Clip Studio Paint are excellent for portrait drawing.
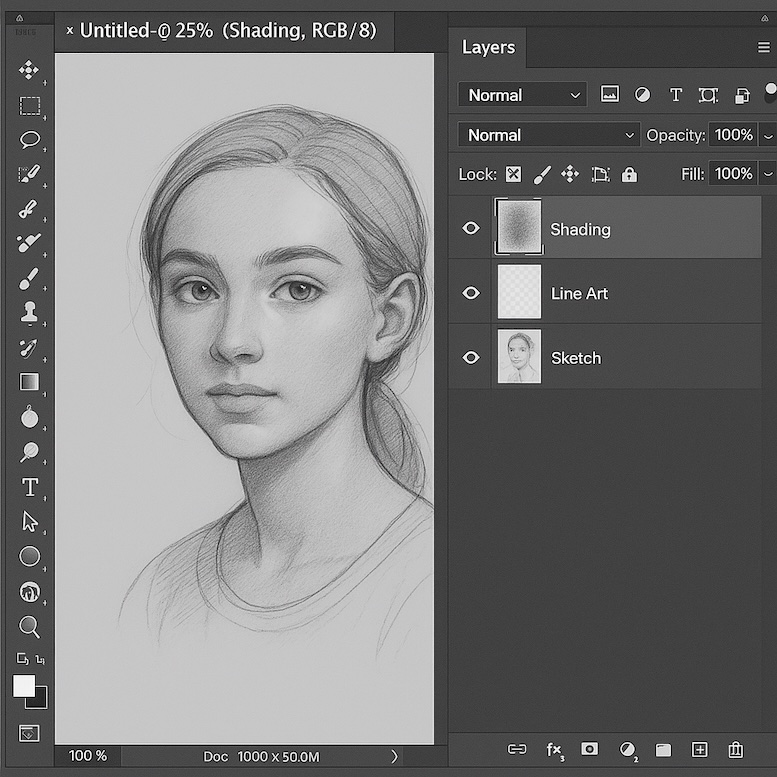
- Layers: Use one layer for construction lines and separate layers for final lines and shading for maximum flexibility.
Workflow Tip
Start with inexpensive materials while you practice. Once you’re more confident, invest in higher-quality tools — they will improve your control and make the drawing process smoother and more enjoyable.
By selecting the right tools and understanding how to use them, you’ll make the entire portrait-drawing process easier, cleaner, and more satisfying. Next, we’ll cover practice strategies and resources that will help you build skill faster and stay motivated as you improve.
Practice Strategies & Resources
Knowing how to draw a face is one thing — mastering it requires consistent, focused practice. The more you draw, the faster you’ll internalize facial proportions, shading, and expressions until they become second nature.
Daily Practice Exercises
Consistency beats marathon sessions. Try short, regular drawing sessions to build muscle memory:
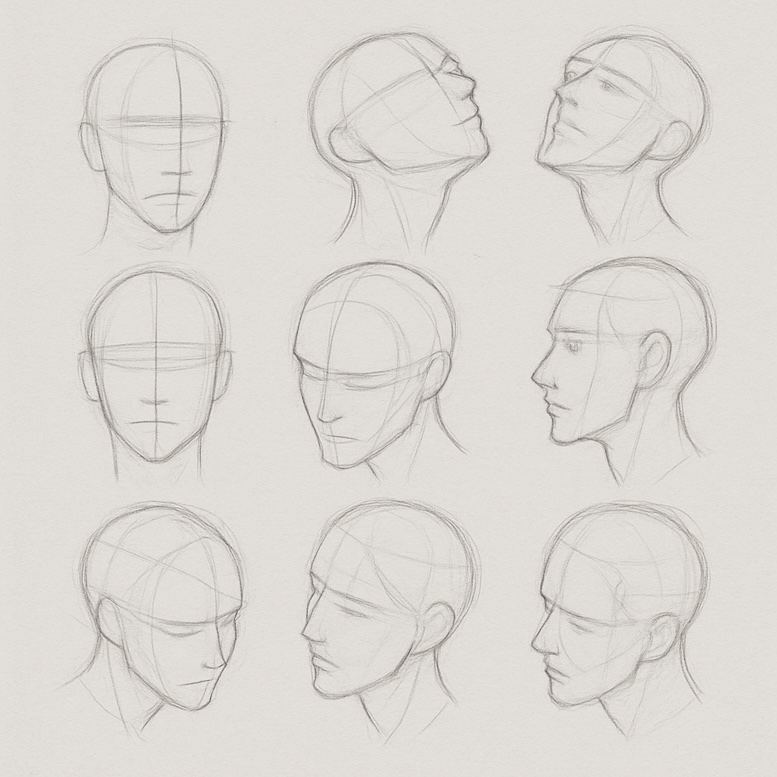
- 5-Minute Head Sketches: Draw quick heads from different angles to loosen up.
- Feature Studies: Focus on one feature per session (eyes one day, noses the next).
- Guideline Drills: Practice mapping facial proportions on blank head shapes until it feels automatic.
Drawing from Reference
Using references is the fastest way to improve accuracy:
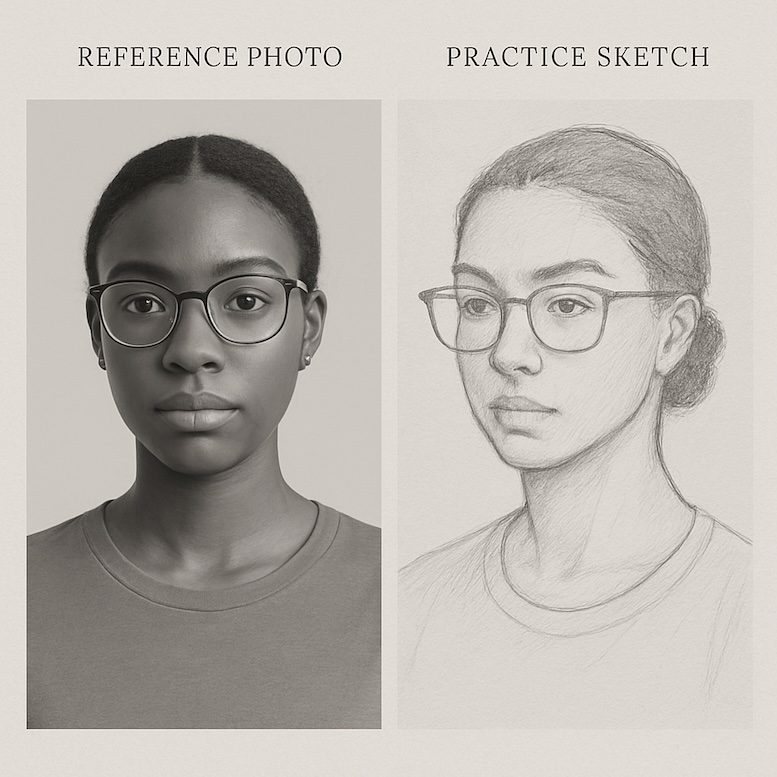
- Photo References: Use free resources like Unsplash, Pexels, or Pinterest boards dedicated to portrait poses.
- Live Models: Draw friends, family, or yourself in a mirror for real-time observation.
- Master Studies: Copy sketches from classic portrait artists to learn their techniques.
Focused Improvement Challenges
Push yourself with targeted challenges:
- 100 Faces Challenge: Draw 100 different faces in 30 days — focus on speed and variety.
- Expression Sheets: Fill a page with 12 small faces, each with a different emotion.
- Age/Character Variations: Redraw the same face as a child, adult, and senior to practice proportion changes.
Recommended Resources
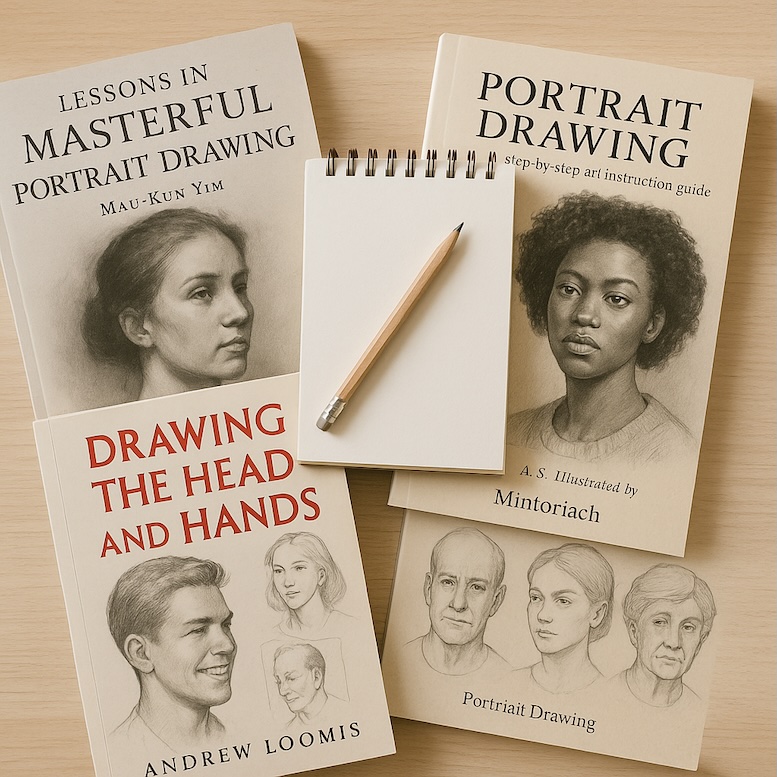
- Books: Drawing the Head and Hands by Andrew Loomis, Figure Drawing for All It’s Worth by Andrew Loomis.
- Websites & Blogs: RapidFireArt, Proko, The Virtual Instructor (for anatomy lessons).
- Video Tutorials: YouTube channels like Proko, Love Life Drawing, and Ethan Becker for free lessons.
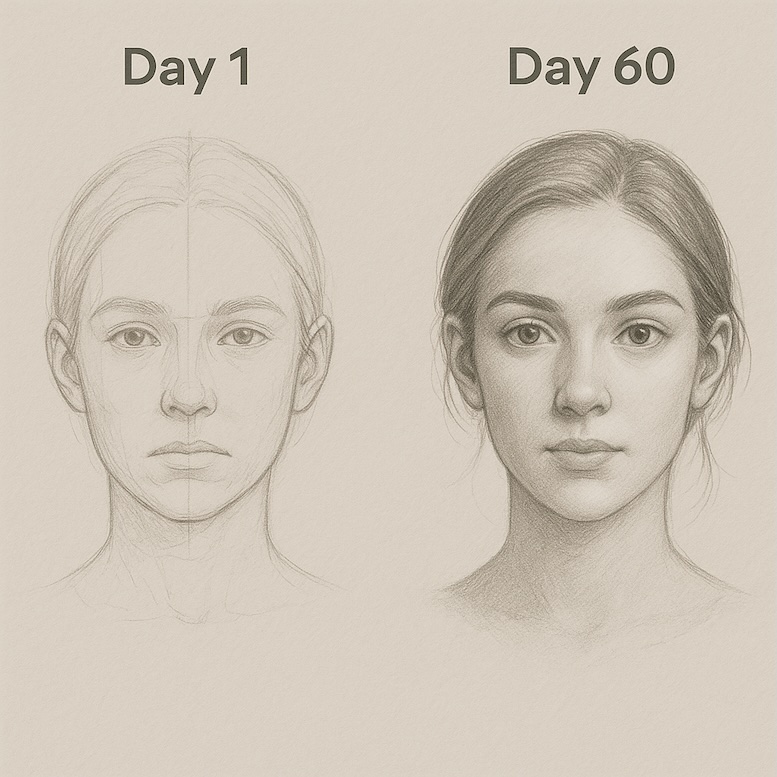
Tracking Your Progress
Keep your first sketches! Compare them after 30 or 60 days of practice to see how far you’ve come — it’s one of the most motivating ways to stay consistent.
By combining consistent practice, solid reference material, and structured challenges, you’ll see steady improvement in your ability to draw realistic, expressive faces. In the next and final section, we’ll wrap up with a motivational conclusion and actionable next steps to encourage readers to keep drawing and share their progress.
Frequently Asked Questions (FAQ)
1. What are the correct proportions for a face?
The eyes should be placed halfway between the top of the head and the chin. The bottom of the nose sits halfway between the eyes and chin, and the mouth lies about one-third of the way between the nose and chin. The face is roughly five eye-widths across.
2. How do I draw a realistic face step by step?
Start with an oval head shape, add vertical and horizontal guidelines, then place the eyes, nose, mouth, and ears according to proportion rules. Refine features, add hair and neck, then shade to add depth and realism.
3. How do I make my face drawings look more 3D?
Think in terms of planes and light. Use shading to show where light hits and where shadows fall — under the nose, below the chin, and in the eye sockets. Adding highlights to cheeks and forehead helps the face “pop.”
4. How do I fix a face drawing that looks flat?
Add construction lines to check proportions, then build in shadow shapes to give the drawing volume. Avoid outlining every feature with dark lines — instead, use light and shadow to define forms.
5. How can I draw different face shapes?
Start with the basic oval, then adjust the jawline and cheekbone angles to create round, square, heart-shaped, or oval faces. Each shape changes how features sit on the face, so experiment with different variations.
6. How do I practice drawing faces effectively?
Do quick daily sketches, focus on one feature at a time, and use photo references or mirrors. A great challenge is to draw 100 faces in 30 days — it builds confidence and improves accuracy quickly.
7. What tools do I need to start drawing portraits?
A set of graphite pencils (2H to 6B), a good eraser (kneaded and vinyl), smooth drawing paper or sketchbook, and blending stumps are enough to get started. Optional: toned paper and white pencils for highlights.
8. How do I draw expressions like happiness or anger?
Study how facial muscles move — for happiness, draw raised cheeks and a slight squint in the eyes; for anger, draw furrowed brows and tensed lips. Subtle changes in eyebrows and mouth corners make a big difference.
9. Is it easier to draw faces from photos or real life?
Photos are great for beginners because they freeze the subject, giving you time to measure and compare. Live drawing helps you see depth, perspective, and subtleties in real time, which improves your skills over time.
10. How do I know if my proportions are correct?
Check your work by flipping it upside down or looking at it in a mirror — mistakes in symmetry will stand out. You can also measure using your pencil to compare distances between features.
Conclusion
Learning how to draw a face is a journey — and now you have all the tools, techniques, and step-by-step guidance to make that journey easier and more enjoyable. By understanding facial proportions, practicing construction lines, and using light and shading effectively, you can turn a blank page into a realistic portrait full of personality.
Remember:
- Start with simple shapes and guidelines before adding detail.
- Practice daily — even 10 minutes a day can dramatically improve your skill.
- Experiment with different angles, expressions, and styles to build confidence.
- Don’t fear mistakes — they are your fastest path to improvement.
Every artist, from beginner to professional, struggled with faces at some point. The difference between frustration and mastery is simply consistent practice and observation.
So grab your sketchbook, pick a reference, and start today. Each face you draw will bring you closer to the confident, expressive portraits you admire.
Call to Action
Share your progress with other artists, or start your own “100 Faces Challenge” and document it online — you might inspire others to learn portrait drawing too. Bookmark this guide and return whenever you need to refresh your knowledge on face drawing techniques or correct your proportions.